In this lecture you will get to see a few of the more commonly used nodes and build on some of the things you learnt in previous lectures. You’ll start off with a series of examples based around the popular MQTT protocol that shows how to wire together a set of basic but very useful message
processing nodes. Then you’ll briefly look at other ways to get messages into and out of your flows using protocols such as TCP, UDP and websockets.
At the end of this lecture you will have a better understanding of some of the basic nodes used in Node-Red flows. You will also have seen how easy it is to build sophisticated processing flows that take real-world events, process them and generate responses that use popular Internet protocols to communicate the results outside of your flow.
Examples
If you want to jump ahead the examples used in this lecture are shown below. Note that examples 3.1 – 3.6 all use a common MQTT node and build on the previous examples, so you might want to read them sequentially.
Example 3.1 Receiving JSON via an MQTT message
Example 3.2 Using the switch node to handle a JSON object
Example 3.3 Using a change node to change or manipulate a message payload
Example 3.4 Using the rbe (report by exception) node
Example 3.5 Scaling input with the range node
Example 3.6 Using an mqtt output node to test the flow
Example 3.7 Using Websockets with Node-RED
Example 3.8 Sending TCP requests.
Example 3.1 Receiving a JSON object via MQTT messaging
This example builds on the MQTT node, which provides a convenient way to take input from an MQTT broker. For those not familiar with MQTT, it is an example of a publish/subscribe system (usually shortened to pub/sub system) which lets sensors publish updates that are delivered to clients subscribed to that sensor. MQTT uses a topic model allowing publishers (e.g. sensors) to create topics and publish data to the topics. Equally, others can subscribe to a topic and will receive asynchronous notification of data posted to the topic.
Pub/Sub systems are a great way to connect loosely coupled distributed systems and they map well to typical IoT patterns where devices or things generate events that you want to share. The MQTT protocol, apart from being asynchronous, is also lightweight and doesn’t have as high an overhead as HTTP; which for resource-constrained devices is often an important advantage. MQTT was originally developed in the late 1990s and has been used in a variety of IoT settings. MQTT became an OASIS standard in 2014 and is a standard part of many IoT toolboxes. MQTT actually stands for Message Queueing Telemetry Transport.
To use the mqtt node, you need to have access to an MQTT broker. There are a number of free MQTT servers running, for example http://test.mosquitto.org/, or the one that will be used in this lecture, www.hivemq.com. Using the broker address and the topic, you can configure the mqtt input node to subscribe on that topic, causing it to generate a new message whenever new data is published on that topic. The message will contain information on the published data, including the data itself in msg.payload and the MQTT broker topic in msg.topic.
To get you started with the mqtt node, you’ll be using the free mqqt broker HiveMQ – which is available via (http://www.hivemq.com/showcase/public-mqtt-broker/). Of course you can use any MQTT broker, including your own, if you have installed one.
First, drag and drop an mqtt input node and configure it for the broker. Don’t forget to configure the topic to something unique, in the case of this example we are using noderedlecture/sensor but you should use your own unique topic, i.e. <your name here>/sensor
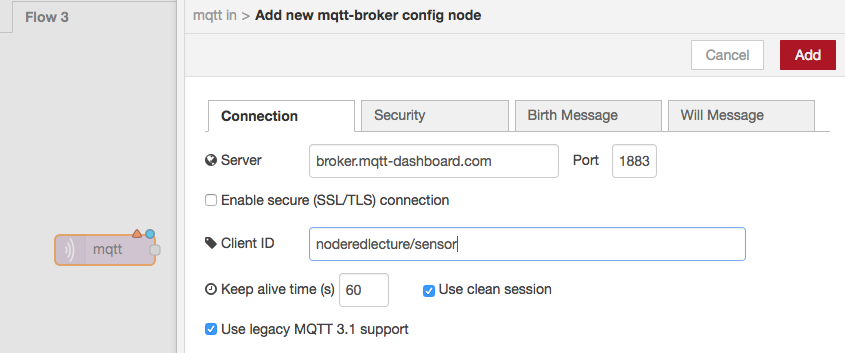
Figure 3.1 Configuring the mqtt node with broker address and topic
Since you are sending a JSON string, you will need to parse the message that the mqtt node generates when it receives the MQTT message. To do that, you’ll need to drag and drop a json node and connect it to the mqtt node’s output.
Node-RED’s json node is a sort of convenience function, in that it parses the incoming message and tries to convert it to/from JSON. So if you send it a JSON string, it will convert it to a JavaScript object, and vice versa. To ensure this conversion happens correctly, configure the json node to convert to a Javascript object using the pull down “Action” field:

To finish off the flow, wire up the usual debug node to the json node and deploy. Check that the mqtt node shows as connected to confirm the flow is running correctly. At this point your mqtt node is in listening mode, waiting for messages sent to the Hive MQTT public broker that use the topic you have specified. Now let’s return to using the HiveMQ dashboard to send a MQTT message via the Hive MQTT broker to your mqtt input node.
There are many ways you can send mqtt messages to hivemq. You can use their websockets client showcase (http://www.hivemq.com/demos/websocket-client/), the mqtt dashboard (http://www.mqtt-dashboard.com/dashboard) or your own library. You’ll be using their websocket client in this example, so navigate to that page and connect to the broker. You will publish a JSON encoded string to the topic you configured to see both the use of the mqtt node and the json node.
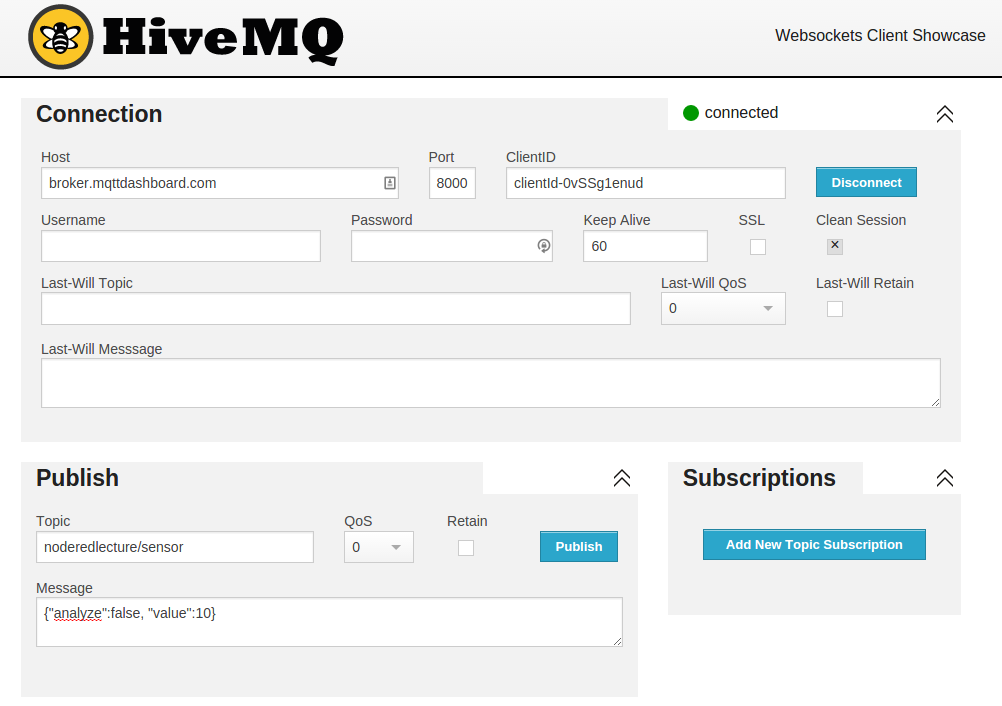
Figure 3.2 Sending an MQTT message (publishing) using the HiveMQ client page.
Using the HiveMQ dashboard, make sure you are connected to the broker, and then use the publish interface to send a simple JSON string {“analyze”:false, “value”:10} as shown in Fig 3.2.
If you return to your Node-RED browser, you will see it printing in the debug tab (Fig 3.3).
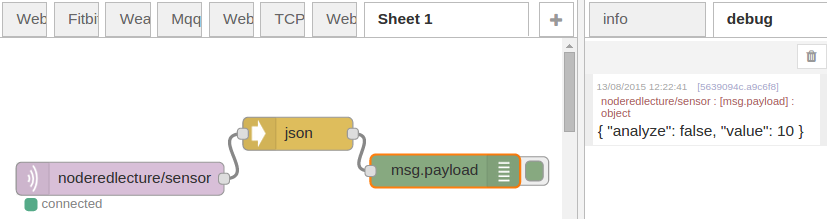
Figure 3.3 Receiving and parsing an MQTT message sent as a JSON string
If you look closely at the output, you can see that the msg.payload contains an object, which itself has two fields, analyze and value, each with their own values. As you saw in lecture 2, you can access these fields via msg.payload.analyze and msg.payload.value. In the next example, we’ll take a look at a node that can do that.
You can copy the flow directly below, or pull it from our github repo.
Copy flow
[{"id":"6ec4dcef.913b24","type":"mqtt-broker","broker":"broker.mqtt-dashboard.com","port":"1883","clientid":""},{"id":"6304660c.9cfb98","type":"mqtt in","name":"","topic":"noderedlecture/sensor","broker":"6ec4dcef.913b24","x":190.0994415283203,"y":150.09091186523438,"z":"a2a2c218.5d5d4","wires":[["d0760869.2f89f8"]]},{"id":"d0760869.2f89f8","type":"json","name":"","x":330.6988220214844,"y":92.18182373046875,"z":"a2a2c218.5d5d4","wires":[["f1f1bca2.0e0e4"]]},{"id":"f1f1bca2.0e0e4","type":"debug","name":"","active":true,"console":"false","complete":"false","x":448.0994415283203,"y":155.09091186523438,"z":"a2a2c218.5d5d4","wires":[]}]You can find the node-red description of this flow at:
https://raw.githubusercontent.com/SenseTecnic/nrguideflows/master/lesson3/3-1_mqqtmessages.json
Back to Lecture 3
PREVIOUS example NEXT example
© Lea, Blackstock, Calderon

This work is licensed under a Creative Commons Attribution-NonCommercial 4.0 International License.