Websockets are another useful communication capability that is built into Node-RED via the the websocket node. Websockets provide a duplex TCP connection and were designed to allow web browsers and servers to maintain a ‘backchannel’ that could be used to augment traditional HTTP interactions, allowing servers to update web pages without the client making a new pull request.
The websocket node comes in two flavours, input and output, allowing you to listen for incoming data (input) or to send (output) on a websocket. The output version is designed to check to see if the output payload originated at a websocket in a node, in which case it responds to the original sender. Otherwise it will broadcast the payload to all connected websockets.
In addition, both input and output websocket nodes can be configured as either server or client – in server mode they ‘listen on’ a URL, and in client mode they connect to a specified IP address.
To see how the websocket nodes work, you’ll use a public websockets echo server which runs on the public site: (https://ws.ifelse.io) and we’ll configure our nodes to ‘connect to’ the server using the wss protocol (rather than http).
Note: the public server at ws.ifelse.io is being provided by a third party as a public service for testing. It is generally reliable, but may be down. So when you test your flow, if you have a problem, check the server is live.
Drag an inject, websocket in, websocket out and a debug node onto the workspace and connect them as shown in figure 3.18.
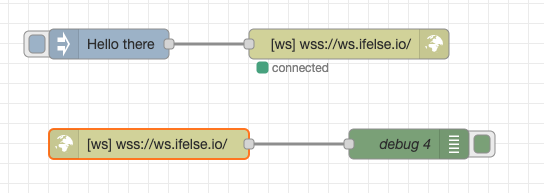
Figure 3.18 using websockets to communicate with a Node-RED flow
Configure the inject node to send a string payload of “Hello There” (Fig 3.19)
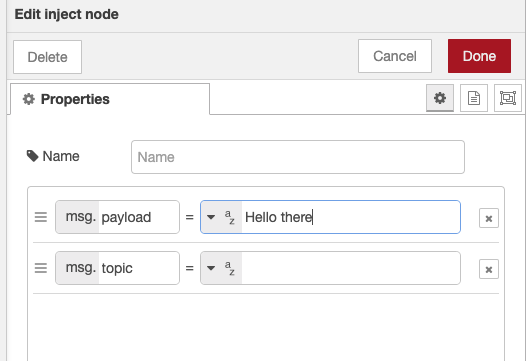
Figure 3.19 Configuring an inject node to send on a websocket
Configure both websocket nodes to connect to wss://ws.ifelse.io as shown in Fig 3.20.
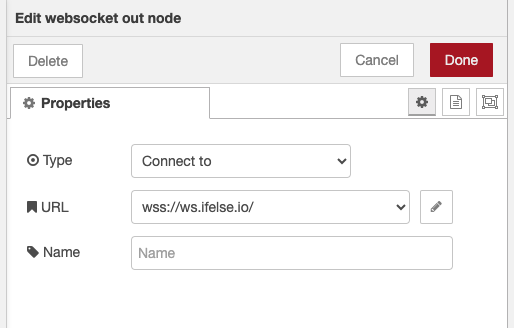
Figure 3.20 Configuring the websocket to send to a public echo server. Do the same for the websocket out node.
Once, configured, deploy the flow and when you click on the inject node you will see the message printed out as shown in Fig 3.21
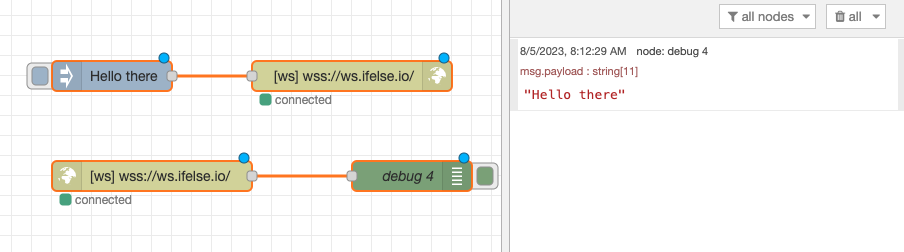
Figure 3.21 Output from a websocket listening for incoming data
You can find the node-red description of this flow at:
Open to view/copy flow
[{"id":"64eae10789363a2b","type":"websocket in","z":"e8c15e3cfd0a495b","name":"","server":"","client":"389a59958c9055b1","x":940,"y":180,"wires":[["979531ab641c0aaa"]]},{"id":"e2baf7a1b4b0d98e","type":"websocket out","z":"e8c15e3cfd0a495b","name":"","server":"","client":"389a59958c9055b1","x":1140,"y":80,"wires":[]},{"id":"a9c38a4d01ee9de7","type":"inject","z":"e8c15e3cfd0a495b","name":"","props":[{"p":"payload"},{"p":"topic","vt":"str"}],"repeat":"","crontab":"","once":false,"onceDelay":0.1,"topic":"","payload":"Hello there","payloadType":"str","x":900,"y":80,"wires":[["e2baf7a1b4b0d98e"]]},{"id":"979531ab641c0aaa","type":"debug","z":"e8c15e3cfd0a495b","name":"debug 4","active":true,"tosidebar":true,"console":false,"tostatus":false,"complete":"false","statusVal":"","statusType":"auto","x":1200,"y":180,"wires":[]},{"id":"389a59958c9055b1","type":"websocket-client","path":"wss://ws.ifelse.io/","tls":"","wholemsg":"false","hb":"0","subprotocol":""}]Back to Lecture 3
© Lea, Blackstock, Calderon

This work is licensed under a Creative Commons Attribution-NonCommercial 4.0 International License.