In this example, you’ll continue your message analysis theme and add nodes to the part of the flow that is used when you determine that the flow should be analyzed. You’ll be using the rbe (report by exception) node which only passes on data if it has changed.
You can set it to examine a message payload and either block until a message changes (rbe mode) or when a messages changes by a specified amount (deadband mode). In rbe mode, it works on numbers and strings. In deadband mode, it works on numbers only and uses the configured deadband as a + or – ‘band’, so that the incoming value can fluctuate within a range before it fires.
If you aren’t following these examples sequentially, you may want to take a look at example 3.1 to see how to create a free MQTT account and then use the credentials to setup the MQTT node used in this example. Example 3.2 explains the switch node and Example 3.3 explains the change node.
You’ll start by adding in another change node which you’ll connect to output 1 of the switch node. You’ll then connect an rbe node to the switch node as shown in Fig 3.10.
Let’s connect a change node, and an rbe node like this. To remind us that this output deals with the flag “analyze”, add a comment node and write “Analyze = true”. Comments are useful when writing complex flows.
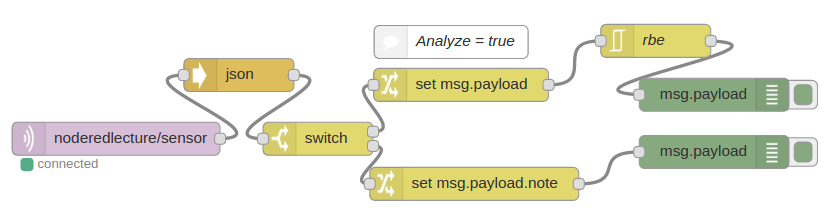
Figure 3.10 Adding an rbe node to check if our input data has changed by more than 20%
Edit the change node to set the msg.payload to msg.payload.value. This will set the output of this node to the value found in the msg.payload.value element of the input received (Fig 3.11).
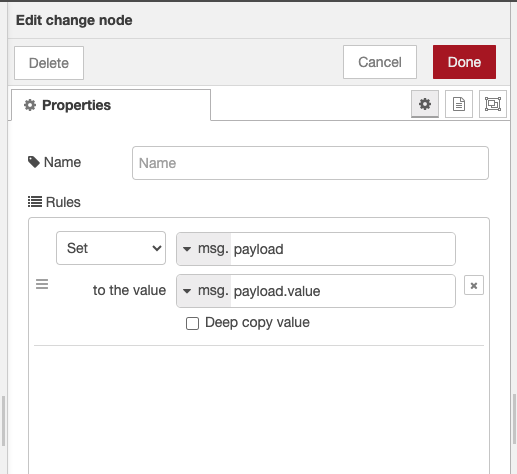
Figure 3.11 Using a change node to set payload
Since you want to determine if this value has changed by 20% or more, you’ll need to double-click on the rbe node and configure it to block unless the value changes by more than 20%.
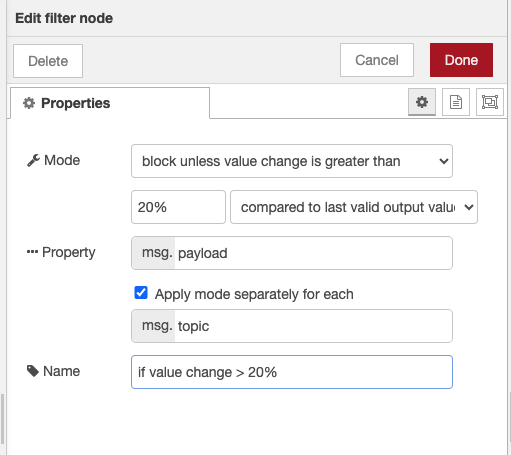
Fig 3.12 Setting the rbe node to check msg.payload.value
To test the flow, deploy this flow and then return to the HiveMQ page and send a series of messages. Firstly, you’ll need to set the analyze value to true so that the switch node sends through a message on output 1. If you use the original message value of 6, this will fail to pass the rbe node. If you then send a second message of value 10, the rbe node will evaluate the difference between 6 and 10, see it is greater than 20%, and send on a message to the final debug node which will print on the debug pane as shown in Fig 3.13.
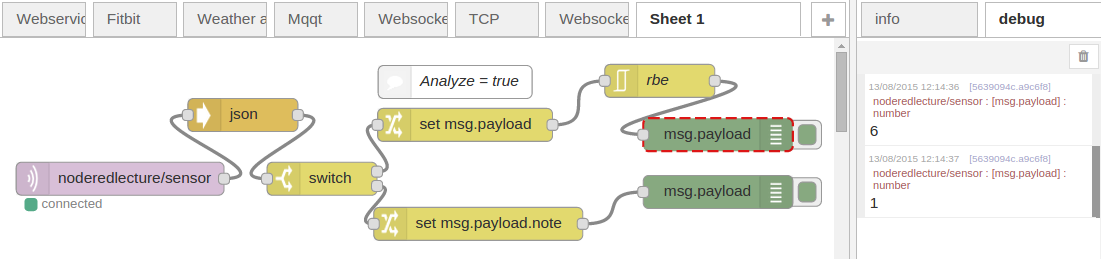
Fig 3.13 Confirming that 10 is more than 20% larger than 6 using an rbe node.
You can copy the flow from here:
Copy example flow
[{"id":"24a6a807bcc8685e","type":"tab","label":"NRGuide-L3-Ex3-4","disabled":false,"info":"","env":[]},{"id":"a08b1e824f7b1932","type":"mqtt in","z":"24a6a807bcc8685e","name":"","topic":"noderedlecture/sensor","qos":"0","datatype":"auto-detect","broker":"bbe24556bc1690f5","nl":false,"rap":false,"inputs":0,"x":240,"y":300,"wires":[["85ed079372c776c1"]]},{"id":"e780a3c1fc07ea1e","type":"switch","z":"24a6a807bcc8685e","name":"","property":"payload.analyze","propertyType":"msg","rules":[{"t":"true"},{"t":"false"}],"checkall":"true","repair":false,"outputs":2,"x":570,"y":220,"wires":[["19d3aadad468ef09"],["27e7aff93053a7c6"]]},{"id":"85ed079372c776c1","type":"json","z":"24a6a807bcc8685e","name":"","property":"payload","action":"obj","pretty":false,"x":410,"y":220,"wires":[["e780a3c1fc07ea1e"]]},{"id":"23b866c39c620b37","type":"debug","z":"24a6a807bcc8685e","name":"isTrue","active":true,"tosidebar":true,"console":false,"tostatus":false,"complete":"payload","targetType":"msg","statusVal":"","statusType":"auto","x":1030,"y":180,"wires":[]},{"id":"5547c0b35fe95eae","type":"debug","z":"24a6a807bcc8685e","name":"isFalse","active":true,"tosidebar":true,"console":false,"tostatus":false,"complete":"payload","targetType":"msg","statusVal":"","statusType":"auto","x":1030,"y":260,"wires":[]},{"id":"27e7aff93053a7c6","type":"change","z":"24a6a807bcc8685e","name":"","rules":[{"t":"set","p":"payload.note","pt":"msg","to":"not being analysed","tot":"str"}],"action":"","property":"","from":"","to":"","reg":false,"x":740,"y":340,"wires":[["5547c0b35fe95eae"]]},{"id":"19d3aadad468ef09","type":"change","z":"24a6a807bcc8685e","name":"","rules":[{"t":"set","p":"payload","pt":"msg","to":"payload.value","tot":"msg"}],"action":"","property":"","from":"","to":"","reg":false,"x":720,"y":160,"wires":[["b5b3a045df0593b1"]]},{"id":"41bfbcdb65f95b32","type":"comment","z":"24a6a807bcc8685e","name":"Analyze = true","info":"","x":690,"y":100,"wires":[]},{"id":"b5b3a045df0593b1","type":"rbe","z":"24a6a807bcc8685e","name":"if value change > 20%","func":"deadband","gap":"20%","start":"","inout":"out","septopics":true,"property":"payload","topi":"topic","x":900,"y":100,"wires":[["23b866c39c620b37"]]},{"id":"bbe24556bc1690f5","type":"mqtt-broker","name":"test mqtt","broker":"broker.mqtt-dashboard.com","port":"1883","clientid":"noderedlecture/sensor","autoConnect":true,"usetls":false,"protocolVersion":"4","keepalive":"60","cleansession":true,"birthTopic":"","birthQos":"0","birthPayload":"","birthMsg":{},"closeTopic":"","closeQos":"0","closePayload":"","closeMsg":{},"willTopic":"","willQos":"0","willPayload":"","willMsg":{},"userProps":"","sessionExpiry":""}]Back to Lecture 3
© Lea, Blackstock, Calderon

This work is licensed under a Creative Commons Attribution-NonCommercial 4.0 International License.