This example continues to use the MQTT node we setup in Example 3.1. If you aren’t following these examples sequentially you may want to review example 3.1 as it shows how to use the free MQTT broker, HiveMQ which we are using for the MQTT node in these examples.
The switch node is designed to ‘switch’ or route messages depending on the incoming message properties. Let’s continue to build on our MQTT example and use the JSON object to explore the switch node.
One of the nice features of having a JSON object is that you can easily act on its properties. For example, you can check the msg.payload.analyze property (which we set up in the previous example) and, depending on its value (true/false), decide to route a message to one of the switch node’s outputs.
Using your flow from Example 3.1, drag a switch node and double-click on it. Configure it to evaluate the property “msg.payload.analyze”. If true, send the message to the first output; if false, send it to the second output as shown in in Fig 3.4.
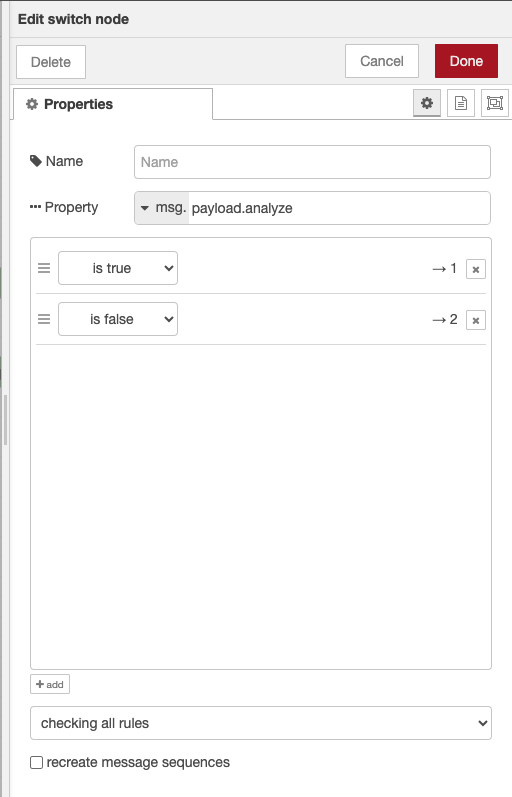
Figure 3.4 Configuring the switch node to route based on a message property
Now you can connect two debug nodes as shown in Fig 3.5 – when you set up multiple outputs for a node, they are numbered from the top, so output 1 is the top output and output 2 is at the bottom in Fig. 3.5.

Figure 3.5 Connecting a switch node to two debug nodes
If you now go back to the HiveMQ input page and send the MQTT message {“analyze”:true, “value”:6}, you will see that the first (top) output is activated and the incoming messages is routed, or ‘switched’, to output 1. If you send the original message {“analyze”:false, “value”:10}, the switch node will activate output 2 and the original debug node will fire. Hovering the pointer over the debug message will show which debug node is printing out the message as shown in Fig. 3.6.
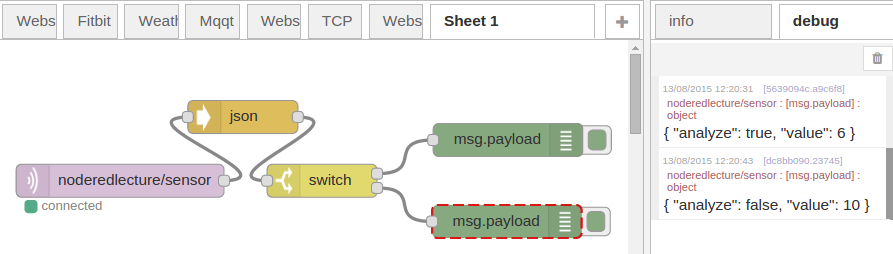
Figure 3.6 Confirming the operation of the switch node
As you can see, this provides you with a built-in Node-RED node that allows you to quickly determine the contents of incoming messages and direct the message through to different parts of the flow depending on the input.
If things don’t seem to be working, check the following:
- The mqtt node is connected properly – it may disconnect occasionally but should auto reconnect
- You are using the same topic in both your flows and the HiveMQ interface
- The json node is set to deliver a javascript object (and not a string) so that the switch node can parse the incoming “analyze” field.
You can copy the flow below:
Copy Flow
[{"id":"14e78330.eb187d","type":"mqtt in","z":"748f4e69dbc20417","name":"","topic":"noderedlecture/sensor","qos":"1","datatype":"auto-detect","broker":"bbe24556bc1690f5","nl":false,"rap":false,"inputs":0,"x":300,"y":320,"wires":[["dfc34d9.f203cb"]]},{"id":"67d23918.982dc8","type":"switch","z":"748f4e69dbc20417","name":"","property":"payload.analyze","propertyType":"msg","rules":[{"t":"true"},{"t":"false"}],"checkall":"true","repair":false,"outputs":2,"x":570,"y":300,"wires":[["6d8dd36.f92722c"],["4a938f5.fb56c7"]]},{"id":"dfc34d9.f203cb","type":"json","z":"748f4e69dbc20417","name":"","property":"payload","action":"obj","pretty":false,"x":471.5993957519531,"y":242.09091186523438,"wires":[["67d23918.982dc8"]]},{"id":"6d8dd36.f92722c","type":"debug","z":"748f4e69dbc20417","name":"isTrue","active":true,"tosidebar":true,"console":false,"tostatus":false,"complete":"payload","targetType":"msg","statusVal":"","statusType":"auto","x":683.9999847412109,"y":246,"wires":[]},{"id":"4a938f5.fb56c7","type":"debug","z":"748f4e69dbc20417","name":"isFalse","active":true,"tosidebar":true,"console":false,"tostatus":false,"complete":"payload","targetType":"msg","statusVal":"","statusType":"auto","x":678.9999847412109,"y":335,"wires":[]},{"id":"bbe24556bc1690f5","type":"mqtt-broker","name":"test mqtt","broker":"broker.mqtt-dashboard.com","port":"1883","clientid":"noderedlecture/sensor","autoConnect":true,"usetls":false,"protocolVersion":"4","keepalive":"60","cleansession":true,"birthTopic":"","birthQos":"0","birthPayload":"","birthMsg":{},"closeTopic":"","closeQos":"0","closePayload":"","closeMsg":{},"willTopic":"","willQos":"0","willPayload":"","willMsg":{},"userProps":"","sessionExpiry":""}]You can find the node-red description of this flow at, but check the json node is configured correctly since it has been updated since this flow was added.
https://raw.githubusercontent.com/SenseTecnic/nrguideflows/master/lesson3/3-2_switchnode.json
Back to Lecture 3
© Lea, Blackstock, Calderon

This work is licensed under a Creative Commons Attribution-NonCommercial 4.0 International License.