This example shows you how to send TCP requests using the tcp node. In this case you will make an HTTP request following the specifications in (http://tools.ietf.org/html/rfc2616#section-5.1.2).
This example shows the use of the tcp node. It could equally be configured with the udp or http nodes in a similar manner.
To get started, let’s connect an inject, function, tcp request, and debug nodes as shown in Fig 3.22.
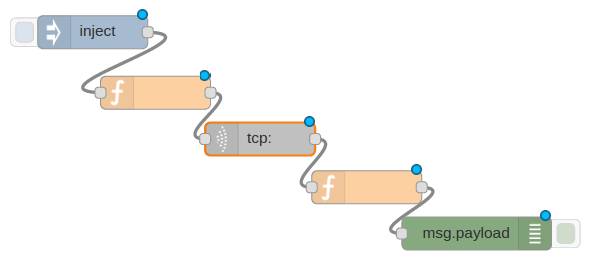
Figure 3.22 building a TCP request and sending on a tcp output node
Edit the first function node to add a function that sets the string “GET / HTTP/1.1\r\n\r\nHost: www.google.com” as payload as shown in Fig 3.23.
This string is a standard HTTP request, indicating it is a GET request, the protocol is HTTP 1.1 and the host is www.google.com. The \r\n\r\n is two return/newline pairs which is required in the HTTP protocol.
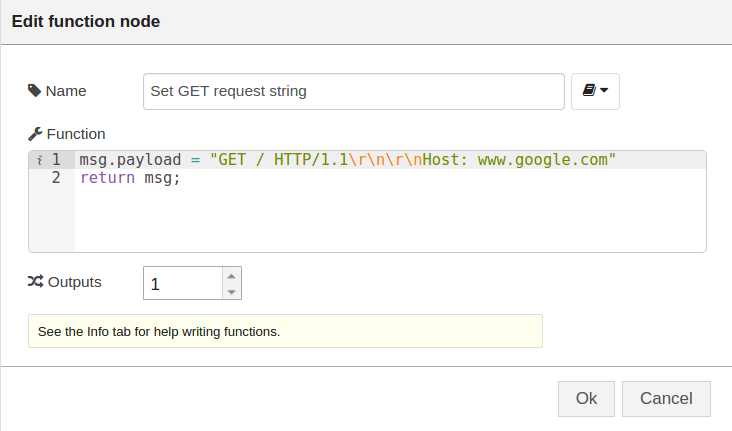
Figure 3.23 Building a TCP request in a function node
Configure the tcp request node to connect to the www.google.com server, on port 80. Configure it to close the connection after 1 second (1000 ms) as shown in Fig 3.24.
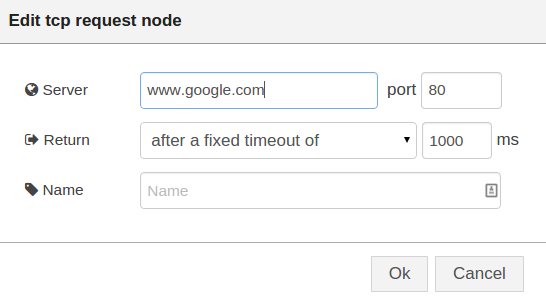
Figure 3.24 Configuring the end-point for a TCP request
The tcp request node response is a buffer and needs to be parsed. Configure the second function node to parse the tcp request node response as shown in Fig 3.25
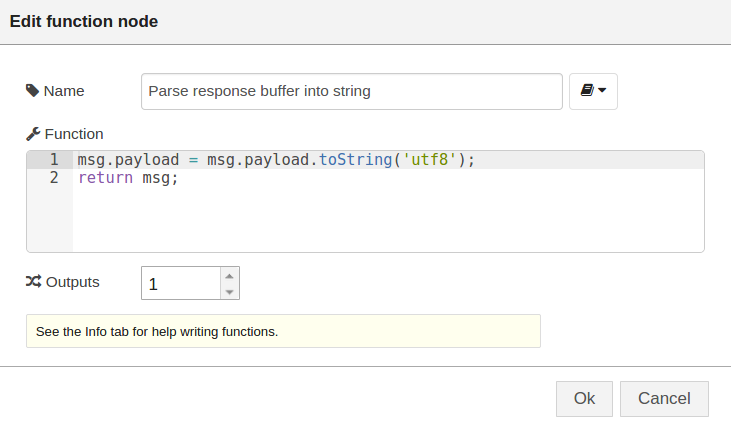
Figure 3.25. A function node to parse a response buffer into a string
If you deploy the flow and click on inject, you will make a request to Google and will get a TCP response. The debug node will print the response as a string as shown in Fig 3.26.
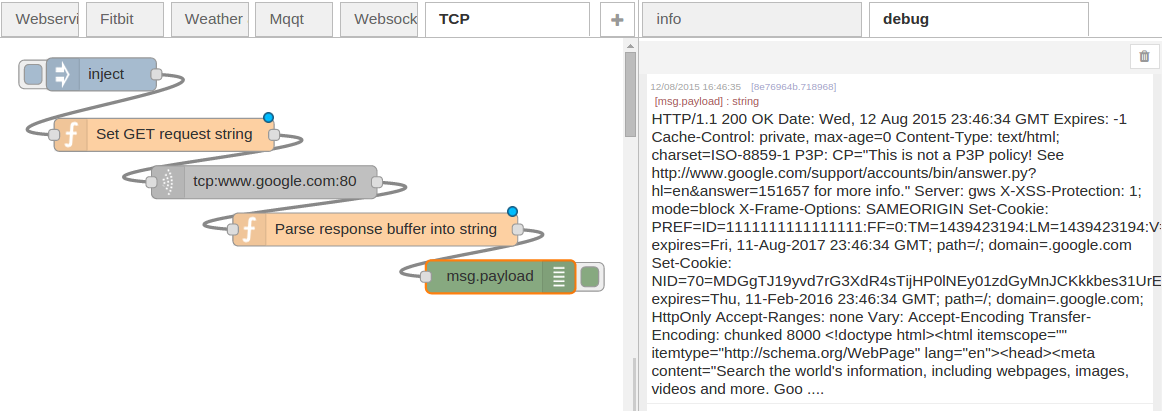
Figure 3.26 Printing out the response to a well formed HTTP request sent over a TCP connection.
Some of you may be wondering why you need to use a function node to build the HTTP request that we sent over TCP. Why not just use the inject node to input the string? The reason is that the inject node ‘escapes’ the string it uses, causing the return/newline you inserted to be removed. This in turn confuses the receiving server (Google) into not returning a response as it waits for the missing return/newlines. So instead, you build the string in a function node. This is one of those ‘gotchas’ that trips up even experienced Node-RED programmers, so always read the info pane for nodes to make sure you understand any limitations or constraints.
You can find the node-red description of this flow at:
https://raw.githubusercontent.com/SenseTecnic/nrguideflows/master/lesson3/3-8_tcp.json
Summary
In this lecture you have seen a series of small examples that use a number of the processing and communication nodes that are available in Node-RED. As you have seen, it is both easy and fast to wire together basic flows that take real-world input, carry out some processing, such as simple data analysis, and return results.
In these examples, you have done little or no coding, but still have been able to build quite complex programs – this is the power of Node-RED.
The next lecture is a quick summary of the basic set of nodes that are available in both vanilla Node-RED as well as the extended set that the FRED service provides. You can read through the lecture to understand the default capabilities, or you can treat the lecture as a reference and use it to look up examples of each node as used in this lecture series.
Back to Lecture 3
PREVIOUS example NEXT example
© Lea, Blackstock, Calderon

This work is licensed under a Creative Commons Attribution-NonCommercial 4.0 International License.