Function nodes in Node-RED were designed to process messages as single entities. However, in some cases your functions might depend on two separate data sources. There are many ways to handle multiple inputs to a function node. This example shows one approach based on context data.
The following approach uses the context object in Node-RED and topics to let a function wait for several messages to arrive in order to return. You saw how to set-up and use context data in Example 5.3 in the previous lecture.
Let’s start by connecting two inject nodes, a function node and a debug node like this (Fig 6.24) to begin experimentimg with multiple inputs to a function node:

6.24 Setting up a flow to explore multiple inputs to a function node
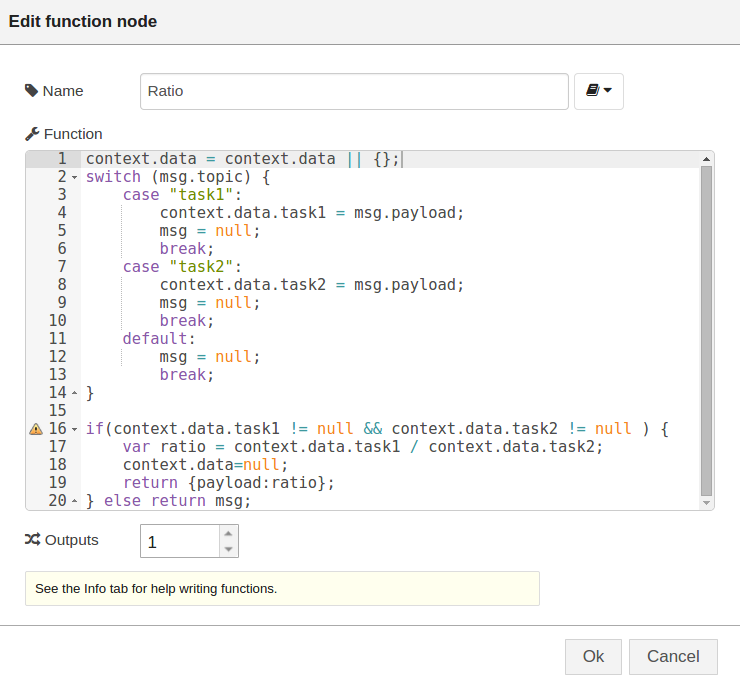
Let’s edit the function node and add the following code (see Fig 6.25). This code will use the context object in Node-RED and add a data element.
Line 1 initializes the context object. Then the switch statement at line 2 looks for the topic field in the message. It uses this to set the task1 or task2 field of the context.data object. Any other message topic is ignored. Line 16 then checks to see if the function has received messages of both topic types (task1 and task2). If not, the function returns a null message and goes back to wait for another message. Otherwise, line 17 calculates the ratio and outputs it as a message.

Figure 6.25 Function node code to wait for all input before proceeding
Show code
context.data = context.data || {};

switch (msg.topic) {
    case "task1":
        context.data.task1 = msg.payload;
        msg = null;
        break;
    case "task2":
        context.data.task2 = msg.payload;
        msg = null;
        break;

    default:
        msg = null;
    	break;

}

if(context.data.task1 != null && context.data.task2 != null ) {
	var ratio = context.data.task1 / context.data.task2;
    context.data=null;
	return {payload:ratio};
} else return msg;
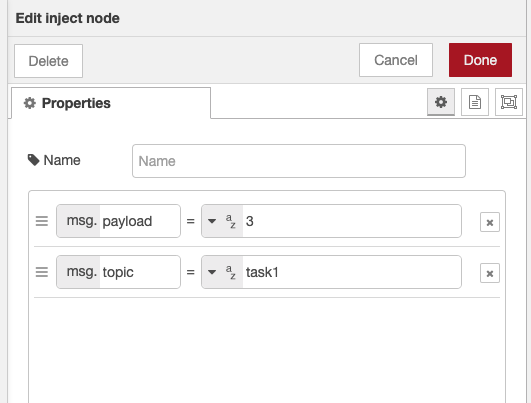
Let’s configure the first inject node to return a string payload of “3”, with a topic of “task1”

Figure 6.26 Configuring an inject node with data and a topic used by a context object
You should configure the second input node to return a payload string of “6”, with a topic of “task2” (not shown but similar to Fig 6.26)
You can then deploy the flow. Click on the left button of the “task1:3” inject node. You will see a success message indicating that the string has successfully been injected, but you will not see anything in the debug tab. Click on the left button of the “task2:6” inject node. You will see a success message and the debug tab will show the ratio as expected:

Figure 6.27 Exercising the multiple input flow of Example 6.7
You can download the entire flow for Ex6-7 from our github repo.
BACK to main Lecture 6