
This tutorial will show you how to make use of an SQLite database using the sqlite node to create database tables and store data. Under the hood, the sqlite node uses SQLite. As a very lightweight relational database, SQLite does not need complex setup procedures. This makes it an ideal database management system to use for embedded systems and rapid prototyping of IoT services.
The tutorial will cover the basics of:
- Setting up the sqlite node and creating a DB and table
- Generating random data and storing in the SQLite DB
- Reading from the SQLite DB
- Graphing the data from the DB using the standard Node-RED UI nodes
For more information on SQLite take a look at: https://sqlite.org/.
New to Node-RED?
If you’re new to Node RED you might find our introductory lectures helpful.
Installing the sqlite node
First, you will need to ensure that you have installed the sqlite node since it is not installed by default in Node-RED.
From the main menu, select menu->manage palette and then using the manage palette configuration box, select the “Install” tab. In the search field enter sqlite and you will see results similar to the screen shot below.
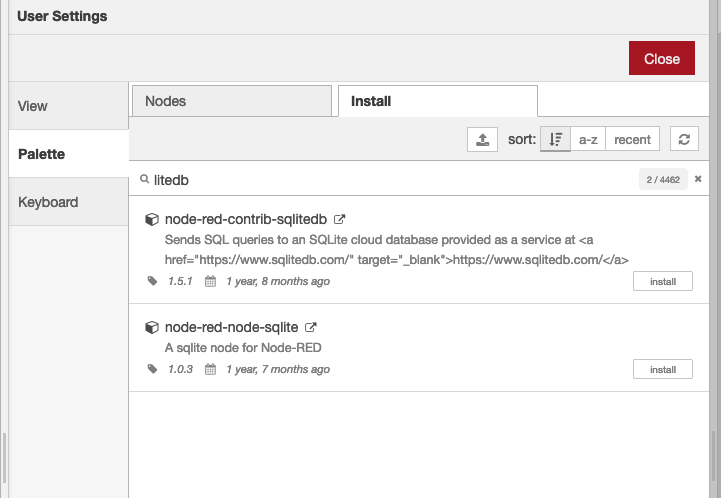
Choose node-red-node-sqlite and select install.
Once the sqlite node is installed, you should see the sqlite node in your left panel. Drag a sqlite node to the empty canvas, and we are ready to move on.
For demo purposes, we are going to create a table and inject random numbers at a constant time interval. We will also look at how to view and manage this data later on.
Creating your first table
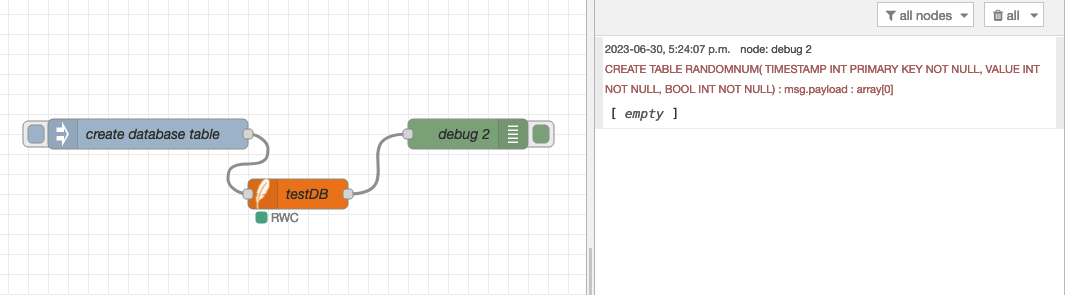
As documented on the info tab of the sqlite node, the node takes in SQL queries in the input msg.topic, and then returns responses in the output msg.payload. To create a table to store some data, all we need to do is send the appropriate SQL command to the sqlite node. A simple way to do that is to connect an inject node to the sqlite node and setup the inject node to deliver the SQL command as the message topic. This is shown below:
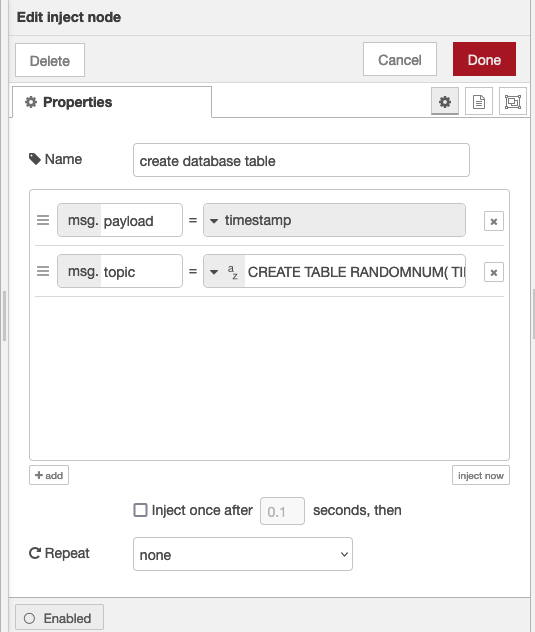
where in the topic field, we have the query
CREATE TABLE RANDOMNUM( TIMESTAMP INT PRIMARY KEY NOT NULL, VALUE INT NOT NULL, BOOL INT NOT NULL)
As you can see, this demo table is called “RANDOMNUM“, and it has three columns, TIMESTAMP( Primary key column ), VALUE, and BOOL. (We will use BOOL to store an attribute which indicates if the number is larger than 50 or not) These three columns are all set to NOT NULL and with type INT.
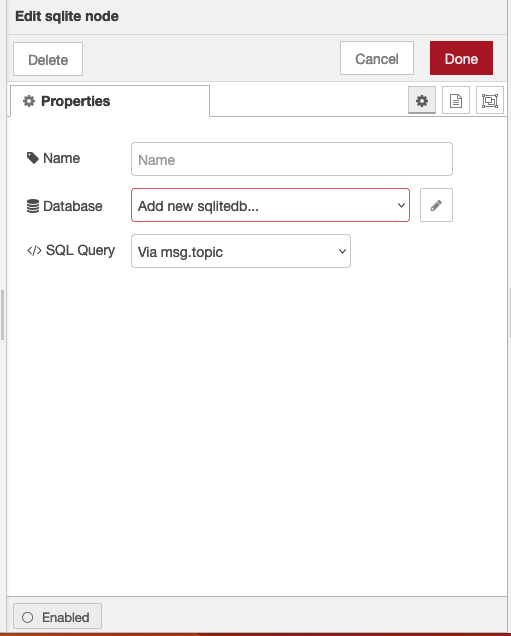
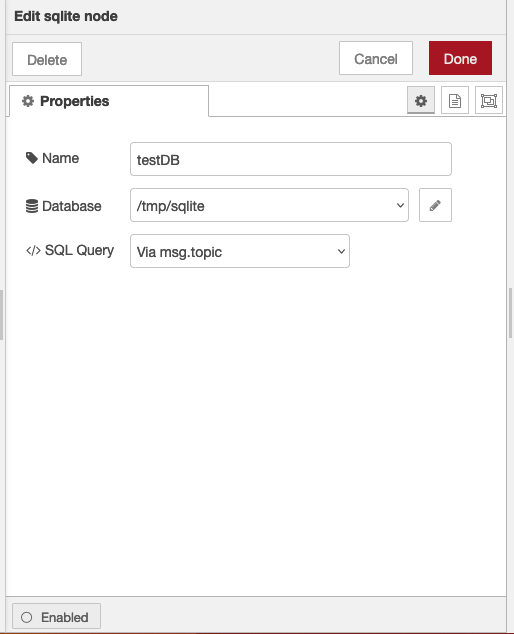
Once the inject node is correctly setup, wire it to an sqlite node and edit the sqlite node properties to configure a basic database on your local machine that the node will use. The steps are as follows; firstly, select “Add new sqlitedb”
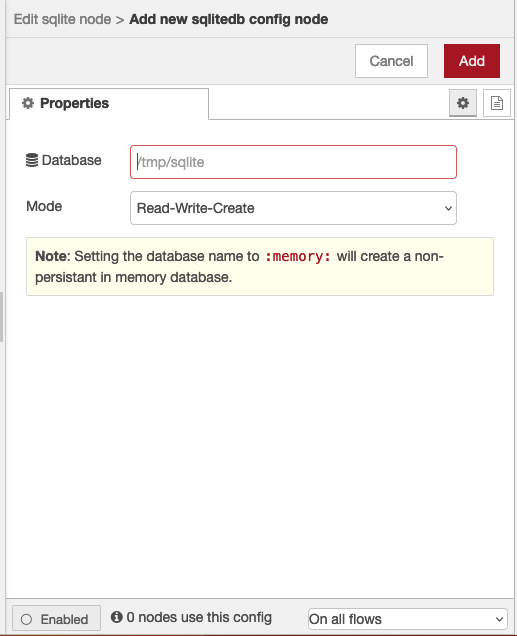
then give a file name where the new DB will be stored on your local disk, in our case we will use the default name /tmp/sqlite (your path may be different depending on your host computer). Obviously you will need to change this if you want it in a local directory or named differently.
Finally, give the Database a name, in our case we will use testDB (we also have used litedb which we used in a previous example) – any name you like is OK.
Once you are done, connect a debug node to the sqlite node, and deploy the current settings. Hit the inject button, and you should see that RANDOMNUM is created.
Inserting Data
We can use the same method to send an SQLite query to the database to inject a new value into the table.
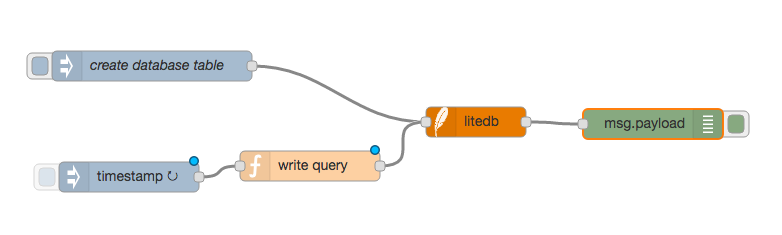
Let’s set up another inject node that injects a new timestamp every 15 seconds simulating a sensor event. This event is then sent to a function node where we will write a query with the input of the timestamp, and send the insertion query to the litedb node.
First, drag a new inject node, and connect this timestamp node to a function node.
We name the function node “write query” and we define the code inside the function node as follows:
var randomNum = Math.round(Math.random()*100);
var largeBool = (randomNum > 50)?1:0;
var newMsg = {
 "topic": "INSERT INTO RANDOMNUM VALUES ( " + msg.payload + ", " + randomNum + ", " + largeBool + ")"
}

return newMsg;
In the above code, a new record is inserted into RANDOMNUM with a timestamp as its primary key, a randomly generated value (ranging from 0 to 100), and a boolean value if the number is larger than 50. Notice that there is no actual boolean data type in SQLite, so we represented boolean as either 0 or 1.
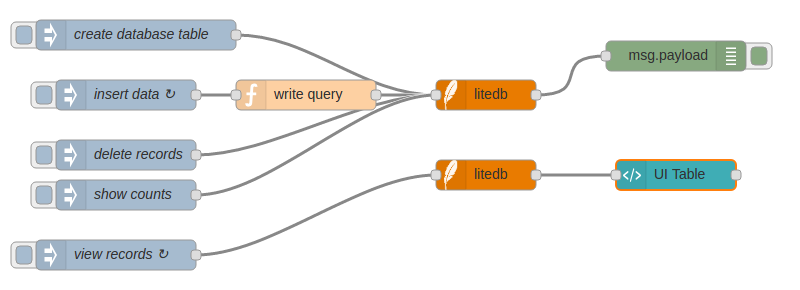
Then, we can just connect the function node to the sqlite node as follow. Once you hit deploy, the inject node will start inserting new records to the table.
If you find these lectures and tutorials helpful, why not buy us a coffee?
Selecting from database
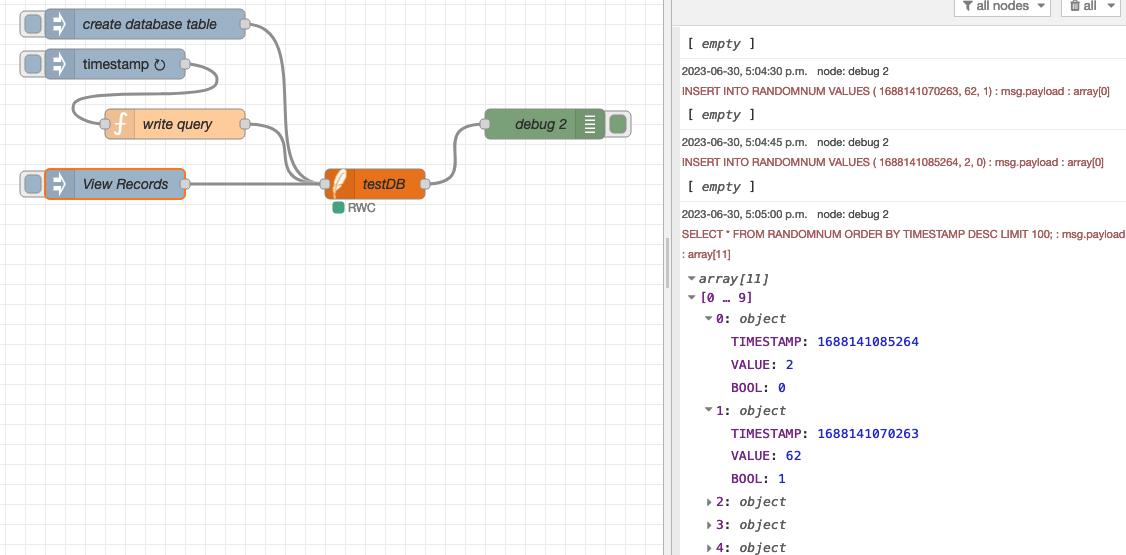
To see the records from our table, we can set up another new inject node, with this in the settings:

where the Topic field is
SELECT * FROM RANDOMNUM ORDER BY TIMESTAMP DESC LIMIT 100;
As you can see, we are showing the first 100 records in table RANDOMNUM ordered by the TIMESTAMP column in descending order.
After you deploy the nodes, and inject the SELECT query command, you should see something like this as the output of the debug node:
SELECT * FROM RANDOMNUM ORDER BY TIMESTAMP DESC LIMIT 100; : msg.payload : array[11]
array[11]
[0 … 9]
0: object
TIMESTAMP: 1688141085264
VALUE: 2
BOOL: 0
1: object
TIMESTAMP: 1688141070263
VALUE: 62
BOOL: 1
Controlling the size of your database
If you follow this guide, you will notice how we set up an inject node that injects records in 15s intervals. In real world scenarios, the database grows in size and may eventually affect the performance of servers. Here we will show you an example of how to delete older records that you do not want to keep.
We will set up another new inject node, and call it ‘delete’. For this example, it will run the delete query every minute, to remove the data that is older than 1 hour.
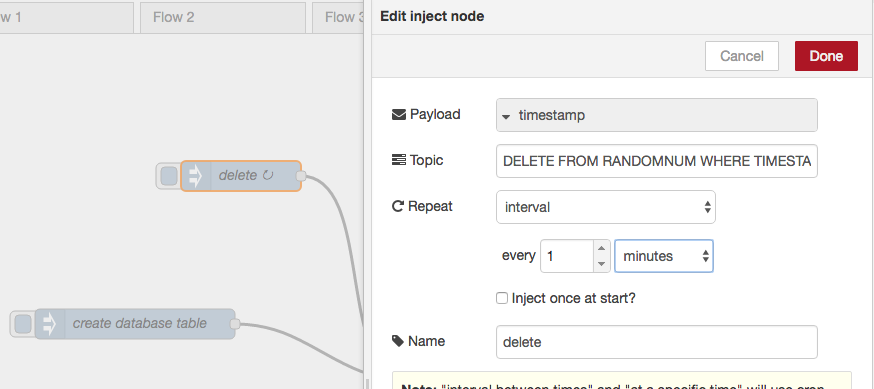
where the query in Topic field is
DELETE FROM RANDOMNUM WHERE TIMESTAMP <= strftime('%s','now', '-1 hours')*1000
Notice that, the timestamp generated from the inject node is UNIX epoch time in milliseconds, but the default timestamp return from the SQLite function strftime() is in seconds. That’s why we need to multiply 1000 at the end.
As you can see here, we use a modifier, ‘-1 hours’, to specify the time interval of data that we want to keep. In our case, this inject query means that we want to clean data that is one hour old every minute. We choose 1 hour in this case just for demo purpose. You can use different modifiers to suit your application, more info on the function strftime() and the modifiers can be found in: https://www.sqlite.org/lang_datefunc.html
While you are trying this deletion node, you can also set up an inject node to count the size of the table with this query
SELECT COUNT(*) FROM RANDOMNUM
Don’t forget to connect the inject nodes to the sqlite node in order to send the query command into SQLite!
Now sit back and see how the node clears out the old data for you in the debug tab.
Visualizing data
Users are able to visualize the data by using the dashboard nodes. You can refer to the tutorial in Lecture 7: Node-RED dashboard (Part2) for more information on how to do this. In this tutorial, we will show you another trick to visualize the data in a table form.
From the previous exercises, we know that when we send
into the sqlite node, it returns an array of records in the response. We can simply use the ui template node to parse the information we want.
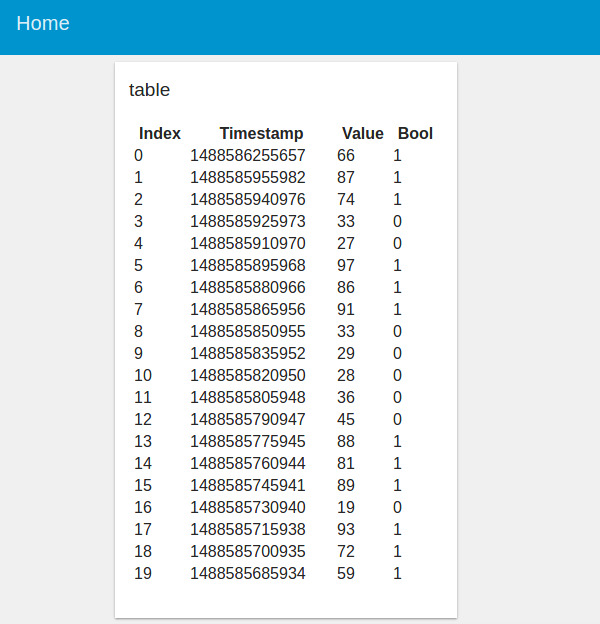
For example, we would like to have a table showing the first 20 records, just simply connect the template UI node to the sqlite node. In this examples, we duplicate the sqlite node so that we only generate a UI table when the view records inject node is used – otherwise the template node would try to display all output!
in the template node, enter the following code:
<table style="width:100%">
  <tr>
    <th>Index</th>
    <th>Timestamp</th>
    <th>Value</th>
    <th>Bool</th>
  </tr>
  <tr ng-repeat="x in msg.payload | limitTo:20">
    <td>{{$index}}</td>
    <td>{{msg.payload[$index].TIMESTAMP}}</td>
    <td>{{msg.payload[$index].VALUE}}</td>
    <td>{{msg.payload[$index].BOOL}}</td>
  </tr>
</table>
and it looks like this in the config tab:
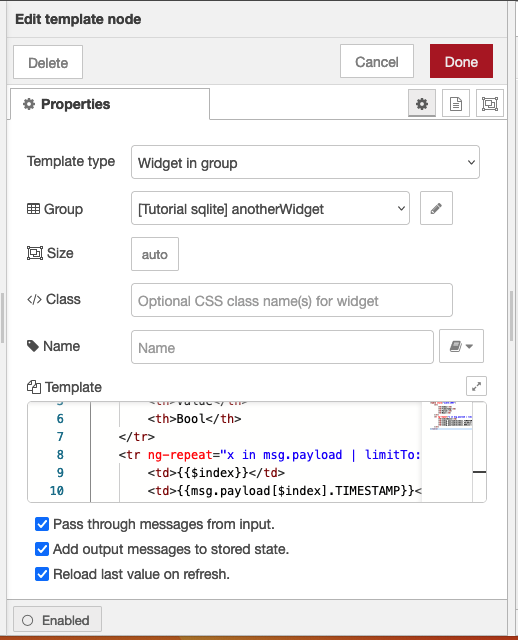
This code simply generates a table in HTML, and places the index, TIMESTAMP, VALUE and BOOL fields from msg.payload into the appropriate cells of the table. It then repeats for the next 19 records (using ng-repeat & limitTo). You can set up the table however you like. Once you deploy the nodes, the UI template node will update the table whenever SELECT * is sent to the sqlite node, and an array of records are returned from the sqlite node to the UI template node. The resulting table would look like this on your dashboard.
This covers basic usage of the sqlite node. Although the example in this guide just stores random generated numbers into the database, you can grab data from any data source and insert it into the database, and query it any way you like. For more information on specific SQLite queries, see https://www.sqlite.org/lang.html
If you find these lectures and tutorials helpful, why not buy us a coffee?