Node-RED is a powerful tool for building Internet of Things (IoT) applications with a focus on simplifying the ‘wiring together’ of code blocks to carry out tasks. It uses a visual programming approach that allows
developers to connect predefined code blocks, known as ‘nodes’, together to perform a task. The connected nodes, usually a combination of input nodes, processing nodes and output nodes, when wired together, make up a ‘flow’.
Originally developed as an open source project at IBM in late 2013, to meet their need to quickly connect hardware and devices to web services and other software – as a sort of glue for the IoT – it has quickly evolved to be a general purpose IoT programming tool. Importantly, Node-RED has rapidly developed a significant and growing user base and an active developer community who are contributing new nodes that allow programmers to reuse Node-RED code for a wide variety of tasks.
Although Node-RED was originally designed to work with the Internet of Things, i.e. devices that interact and control the real world, as it has evolved, it has become useful for a range of applications and is now considered one of the pre-eminent low code/no code visual development tools.
This lecture will introduce you to some examples of Node-RED, both to give you a sense of its capabilities and to introduce its basic concepts. We’ll also discuss the history of Node-RED and its origins to give you an idea of what Node-RED is good for and of what types of tasks are best left to a more traditional programming language and environments.
By the end of this lecture you should have a high-level understanding of Node-RED, its programming model and some simple pre-built nodes as well as an insight into the origins and best usage of Node-RED.
Getting to know Node-RED
Let’s get started by looking at a few simple examples of the kinds of thing you can do with Node-RED. Our goal in this lecture is not to get you programming with Node-RED, but to give you a sense of its capabilities through some high level examples. If you really want to dive straight in, you can skip ahead to lecture 2 where you’ll be taken through the steps to create and run your first flow.
This first example flow will receive a message from a Twitter feed containing a hashtag and turn on and off a LED when a new tweet has arrived. For this example let’s assume that NODE-RED is running on a Raspberry PI – a common situation for many Node-RED users.
Example 1.1 Using Twitter to control a Raspberry PI LED
The Node-RED flow to check Twitter and to see if a hashtag #led is detected, turns on a LED connected to a Pi is shown in Fig. 1.1. As you can see, it’s quite simple; it consists of 3 nodes wired together – a twitter node on the left, a trigger node in the middle and a Raspberry Pi (gpionode) node on the right. (gpio stands for General Purpose Input/Output and is the name given to the generic Raspberry PI node that handles IO). The nodes, represented by rounded boxes, usually have an icon to represent their type, e.g. the Twitter bird icon in the first node, and a text name that can be set by the programmer.
Each of these three nodes is available within the Node-RED visual programming tool and can be dragged from a node palette onto the main workspace. They are then ‘wired’ together by joining their output tabs to the input tab of the next node in the flow (the little grey blobs on the right or left of the node boxes.) The next lecture will look at the visual programming UI in detail, but for now let’s focus on the high-level capabilities.
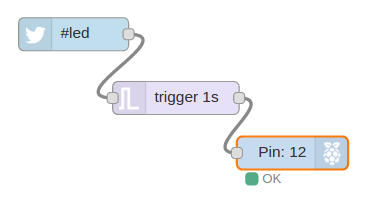
Figure 1.1 A simple 3 node flow that uses a Twitter tag to trigger a LED on a Raspberry PI.
The Twitter node is available from the standard node-RED library and once installed, the node can be dragged onto the development canvas and hides all of the complexity of using the Twitter API. It can be configured with a user’s account credentials and a variety of search strings, in our case it’s simply looking for hashtag ‘#led’.
When the Twitter node sees the tag either in a tweet to the user, or the public tweet feed, it creates a new message with the details of the tweet, which is forwards to the next node in the flow. In our example, since the Twitter node’s output is wired to the trigger node’s input, the trigger node receives a message with the details of the tweet.
The trigger node is another built-in node in Node-RED and its default behaviour is to wait for any message on its input. When it receives a message, it ‘triggers’, and sends a message on its output with the value “1” as the message body. It then waits 1 second and sends a second message with the value “0” in the message body.
Since the trigger node is connected to the gpionode, which controls the Input/Output or IO pins on the Raspberry PI, it get’s these two messages, one second apart, on its input.
Again, the gpionode is a built-in node in Node-RED that hides the details of setting the IO pins on the PI. When it gets a message with a value of “1” in the body, it takes the IO pin high, and when it receives a message with body of “0”, it takes the pin low. In this example, the gpionode is configured to control pin number 12, and so the node shows that in the node icon.
If you have your PI wired up with an LED connected to Pin 12, the gpionode going high for 1 second and then low will cause the LED to blink on for 1 second.
If you think about what’s happening here, it’s actually an incredibly powerful example of Node-RED and the Internet of Things (IoT). It’s connecting the ‘Twitterverse’ to a PI and a LED, but requires no programming – all the tasks are carried out by pre-built nodes in Node-RED which just need configuring. This really demonstrates the power of Node-RED when running on a simple device such as a Raspberry PI.
So just to recap. Node-RED is a flow-based programming tool with a visual editor that allows you to wire together nodes to create flows. In this case, 3 nodes create our first flow. Real-world events, e.g. a tweet with the #led hashtag, are converted to messages, which ‘flow’ along the wires between the nodes. Nodes process messages on their input and, as a result, send messages on their outputs to the next node in the flow. In this simple example, we look for a tweet with hashtag #led and use it to trigger a message to a Raspberry PI node that cause IO pin 12 to go high for 1 second, which in turns causes a LED to blink on for 1 second.
This example – and the rest in this lecture – are mostly to show you the kinds of things we can do with Node-RED – to give you a sense of how it works. If you can’t wait to get started, skip to the next lecture which talks you through creating your first flows.
Example 1.2 Using Node-RED to alert you when you’re falling behind on your exercise schedule
Our second example shows a different usage of Node-RED. Rather than controlling a device such as a Raspberry PI, this flow combines weather info and your fitbit usage to send you an email alert when the weather is good and you’re behind on your exercise schedule. The flow is a little more complicated, using 6 nodes (see Fig 1.2), but again, by using built-in nodes you can accomplish complex tasks with little or no programming.
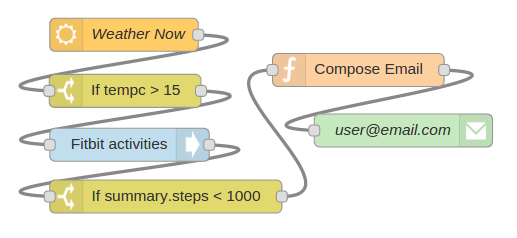
Figure 1.2 A simple flow to alert you when you are not exercising and the weather is good
As before, nodes are dragged from the node palette in the Node-RED UI and wired together on the flow canvas. Starting at the leftmost node, let’s begin with an openweather node which you can configure to check the weather for any major city at set intervals. When it checks, it packages up the results in a message which is forwarded to the next node, in this case, to a switch node. The switch node performs a simple test, checking the input message for a value and sending a message with a value of “1” if the test is true. In our case, it’s been configured to test the temperature value (tempc) to see if it’s 15 degrees celsius or higher.
When the switch node tests to true, or ‘switches on’, it sends a message onto the fitbit node which is the next node in the flow. The fitbit node is another powerful pre-built node that you can configure to get statistics on your fitbit device from the fitbit.com portal. The fitbit node packages the statistics for your device into a message and forwards it to the next node in the flow.
The next node is another switch node. This one has been configured to check if the number of steps you’ve walked today is less than 1000. It does this by testing to see if the fitbit data field, summary.steps, is less than 1000. Remember, it just got these statistics in a message from the fitbit node, which in turn got them by making a call to the fitbit API on fitbit.com.
If you have walked less than 1000 steps today, then the switch node generates a message that is passed on through the flow to a function node. The function node is a generic all-purpose node that allows you to write your own programming logic in Javascript. This node will be discussed in more detail in the next lecture. For now you can assume that this node just creates a new message with an email subject line and a text body that can be sent by email.
Once this message is created within the function node, it is sent through the flow to the final node which is an email node. This node will take the body of any incoming message and send it to the email account configured when the node is initialized. In this case, you’d set it up to send a message to yourself.
So again, a very simple flow that uses the power of Node-RED’s pre-built nodes to check your local weather, and if it’s reasonably warm and you haven’t done much walking today, it sends you an email reminder.
Although the example seems quite simple, just checking the weather and your fitbit activity, you can use similar flows to check the status of home devices, of computers in your server farm, of devices in a factory, etc., and you can then use output nodes to send mail, tweets, make API calls to back-office software, control real world devices – in fact the choices are endless. Node-RED is an extremely powerful tool for wiring together inputs and outputs and offers many nodes, either built in or developed by the Node-RED community, to carry out an amazing range of tasks.
Example 1.3 Building a simple web service using Node-RED’s built-in HTTP nodes
Our final example in this high-level introduction is yet another class of flows. It shows how to create a simple web service that responds to a browser sending a HTTP request by querying some real-world data, and then delivers a web page with a graphical representation of that data back to the browser – essentially Node-RED is being used to provide a web server and simple service all with a few nodes.
Sticking with the fitbit node introduced in the previous example, this example creates a simple web service that allows you to query your fitbit stats for the day and, using a nice donut chart, display how many calories you’ve ‘burned off’ through exercise.
The flow is shown in Fig 1.3 and consists of 4 nodes. The first and final nodes are http input and output nodes that work together to listen for HTTP requests and send HTTP responses. This flow listens for a HTTP request from any source, but let’s assume a regular browser here. When it arrives, it queries your fitbit stats from fitbit.com, then uses a template node to build a HTTP page, and passes that to the http output node which sends back the webpage to the browser.
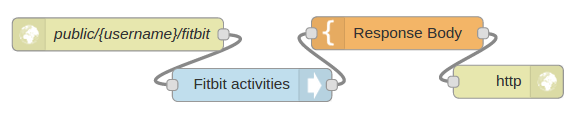
Figure 1.3 A simple web server example to graph fitbit data
Again, this is just to give you a sense of the power and flexibility of Node-RED without going into all the details of how this flow works. You’ll get to know more about that in later lectures. At a high level, the http input node has been configured to listen for HTTP requests on a URL.
When a HTTP request comes in, the http input node creates a message to trigger the fitbit node, which is the next node in the flow. The fitbit node gets the current statistics for the user, and then passes those statistics, as a message, to a template node. The html template node is another pre-built node in Node-RED, which, like the function node, allows you to build arbitrary code. However, rather than using JavaScript like the function node, the template node works with text such as HTML.
The HTML code in the template node is shown in Listing 1.1, so, for those who want to see the details, you can see what’s happening. Basically, the template node takes the calorie consumption data from fitbit and, using a 3rd party graphing library, creates a simple HTML file that will tell the receiving browser to use the 3rd party graphing library to display a donut chart of calorie consumption.
Listing 1.1 A simple HTML template to display a donut chart of calorie usage
View HTML code
- <!doctype html>
- <head>
- <title>A Node RED Example</title>
- <link rel=”stylesheet” href=”//cdnjs.cloudflare.com/ajax/libs/morris.js/0.5.1/morris.css”>
- <script src=”//cdnjs.cloudflare.com/ajax/libs/raphael/2.1.0/raphael-min.js”></script>
- <script src=”//ajax.googleapis.com/ajax/libs/jquery/1.9.0/jquery.min.js”></script>
- <script src=”//cdnjs.cloudflare.com/ajax/libs/morris.js/0.5.1/morris.min.js”></script>
- </head>
- <html>
- <div id=”chart-example” style=”height: 250px;”></div>
- <script>
- Morris.Donut({
- element: ‘chart-example’,
- data: [
- {label: “Activity Calories”, value: {{payload.summary.activityCalories}} },
- {label: “Calories BMR”, value: {{payload.summary.caloriesBMR}} },
- {label: “Calories Out”, value: {{payload.summary.caloriesOut}} }
- ]
- });
- </script>
- </html>
Once the template node has generated the HTML file, it passes it as a message to the final node, which is a http response node. This node packages up the HTML as a HTTP response which it send back to the browser.
The user will then see a simple donut chart of their calorie usage for the day (see Fig 1.4) – all built and served by a simple Node-RED flow!
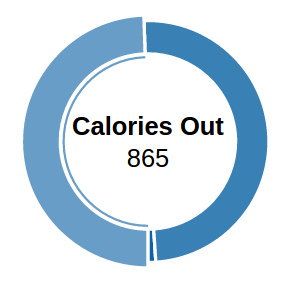
Figure 1.4 A donut chart, served up by Node-RED showing calorie counts from fitbit
The History of Node-RED
As the examples in the previous section have shown, Node-RED is a powerful tool for building IoT applications and services. Its genesis was triggered exactly by this need to rapidly prototype IoT applications and Node-RED was created as an open source project by the IBM Emerging Technologies group, in particular by two researchers, Nick O’Leary and Dave Conway-Jones. They created Node-RED initially as a tool for themselves as they were working on IoT projects and were “looking for a way to simplify the process of hooking together systems and sensors when building proof-of-concept technologies for customers.”
An initial version of Node-RED was released as an open source project in late 2013 and built up a small but active user and developer group during 2014/15. Subsequently it has evolved into a powerful no code/low code tool used in a number of domains. It has established itself as a rapid prototyping tool with the IoT domain and now used by many developers and manufacturers in both IoT edge devices and as the glue that links IoT devices and back end services. It has also been adopted in diverse domains such as Robotics, DevOps, Web Services, Chatbots and many more – in fact its hard to name a domain where somebody isn’t busy developing with Node-RED
This rich set of users in a variety of domains is one of the strengths of Node-RED – today there is a vibrant user and developer community, with a core group working on the Node-RED code itself and most developers contributing nodes or flows to the flow library from across that diverse set of domains. Thus ensuring that no matter what your goals, you will be able to find existing nodes and even flows ready made and waiting for you to use!
Node-RED and the IoT
When the IBM folks created Node-RED, they were mostly focused on the Internet of Things, i.e connecting devices to processing and processing to devices. As a tool for rapid application development for the IoT, Node-RED is both powerful and flexible. Its power comes from a combination of two factors:
- Node-RED is an example of a flow-based programming model – messages representing events flow between nodes, triggering processing that results in output. The flow-based programming model maps well to typical IoT applications which are characterised by real-world events that trigger some sort of processing which in turn results in real-world actions. Node-RED packages these events as messages which offer a simple and uniform model for events as they flow between nodes that make up the flows.
- The set of pre-built nodes is the second part of the Node-RED story. By building a set of powerful input and output nodes, each of which hides much of the complexity of interacting with the real world, Node-RED offers developers powerful building blocks to allow them to quickly put together flows that accomplish a lot, without having to worry about the programming details.
These two factors make Node-RED a powerful tool for IoT application development. When combined with the flexibility to create and use nodes such as the function node, which allows the developer to quickly write arbitrary JavaScript, plus the Node-RED community, who are constantly creating and sharing new nodes.
However, Node-RED isn’t always the best tool for IoT application development. While powerful and flexible, it isn’t always the right solution. Some situations where Node-RED may not be the first choice include:
- Complex multi-function IoT applications. Node-RED excels at rapid application development and at acting as the glue for connecting events to actions, or sensors to actuators, if you like. However, when an application gets above a certain size, it becomes complex to visually program and manage through Node-RED. There are some features to help with this, e.g. sub-flows (see lecture 5), but eventually the UI becomes a bottleneck.
- Flow-based programming is a programming model that is not always the most suitable for application development. In much the same way that certain programming languages excel at some tasks but not others, flow-based programming has its weaknesses. A good example are loops: Node-RED is cumbersome when handling loops.
- Specific use cases. Flow-based programming is a general purpose model and not targeted or optimized for specific needs, for example Data Analytics or User Interface development. At the moment Node-RED has no specific support for these type of applications and no easy way to add such support. Obviously, because the underlying technology of Node-RED is JavaScript, you can leverage its capabilities for these needs. If want to use Node-RED to prototype something, one approach is to implement parts or all of your application in another language more suited to your task and use Node-RED for the overall control.
Having said that, as has been shown in this lecture and will be demonstrated in the following lectures, Node-RED is a powerful tool for a large number of IoT applications and is in daily use commercial IoT companies as well as hobbyists and hardware hackers.
Perhaps just as important, as you explore Node-RED in subsequent lectures, you will realise that although Node-RED’s roots are in the IoT, it is a tool that can be used to build a wide variety of applications, not just IoT applications. In fact, in these lectures you will see example of Node-RED being used for web apps, social media apps, back-office integration, IT task management, i.e. across the range of modern computing tasks.
Our hope is that by the end of this lecture course, you will see Node-RED, as we do, as a flexible and powerful tool that can be used in many situations, both for prototyping but also for production level development.
Summary
In this lecture we’ve taken you through a high-level look at Node-RED. You’ve seen how Node-RED wires together building blocks, using a visual tool to rapidly create simple flows that actually carry out sophisticated real-world tasks. You’ve also learnt a little about the origins of Node-RED as a rapid application development tool for the IoT and how, as it has evolved, it’s now being used for a variety of tasks, not just IoT programming. Finally, we’ve discussed the limitations of Node-RED and indicated some areas where other languages and tools may serve you better. In the next lecture, we’ll start on some real programming and show you how to build your own flows using the basic nodes that Node-RED provides.
If you find these lectures and tutorials helpful, why not buy us a coffee?
© Lea, Blackstock, Calderon

This work is licensed under a Creative Commons Attribution-NonCommercial 4.0 International License.