As you’ve seen in previous lectures, Node-RED uses a visual flow-based programming paradigm[1]. This is not unique to Node-RED. Similar approaches have been used in many other domains such as music and multimedia (Max MSP), toys (Lego Mindstorms), enterprise application integration and industrial automation (LabVIEW). Like these tools, Node-RED makes it easy to switch between design and development for rapid integration, prototyping and development tasks. So far, you’ve seen how to wire simple flows together and some of the basics of Node-RED programming.
In this lecture, you’ll take a more detailed look at Node-RED’s programming model and some of its key concepts and explore the details of the message flow model that underlies Node-RED. Then you’ll dive into how to program your own function nodes using JavaScript and create reusable sub flows to add your own functionality to the set of nodes supplied with Node-RED.
| We use a cloud hosted version of Node-RED for these lectures called FRED. Sign up for a free account at FRED. Examples in the early lectures will work with other installations of Node-RED, later lectures use nodes you will need to install yourself if you don’t use FRED. |
Examples
Example 5.1 Creating and returning a new message in a function node
Example 5.2 Creating and returning multiple messages in a function node
Example 5.3 Using Context in a function node
Example 5.4 Using Global Context
Example 5.5 Creating a sub-flow
Example 5.6 Packaging Function nodes using sub-flows.
Example 5.7. Creating a Slack Bot to query data
Key Concepts
As you’ve learned so far, when you program with Node-RED, you create flows that are networks of lightweight components, called nodes, that exchange messages along pre-defined connections or wires. Let’s look at these concepts in a bit more detail.
Flows
Node-RED programs or flows are a collection of nodes wired together to exchange messages. Under the hood, a flow consists of a list of JavaScript objects that describe the nodes and their configurations, as well as the list of downstream nodes they are connected to, the wires.
Messages
As discussed in Lecture 2, messages passed between nodes in Node-RED are, by convention, JavaScript Objects called msg, consisting of a set of named properties[2]. These messages often contain a msg.payload property with, you guessed it, the payload of the message. Nodes may attach other properties to a message, which can be used to carry other information onto the next node in the flow. When this happens, these extra properties will be documented in the node documentation that appears in the node info pane when you select a node in the Node-RED workspace.
Messages are the primary data structure used in Node-RED and are, in most cases, the only data that a node has to work with when it is activated. This ensures that a Node-RED flow is conceptually clean and stateless – each node is self-contained, working with input messages and creating output messages. Apart from the use of context data (see later in this lecture), this means that the effect of a node’s processing is either contained in its output messages, or caused by internal node logic that changes external things such as files, IO pins on the Raspberry Pi or Dropbox files; there are no side effects that could affect the behaviour of other nodes or subsequent calls to the same node.
This is one of the key advantages of a flow-based language. Because nodes are self contained and typically only interact with other nodes using messages, you can be sure that they have no unintended side effects and so can be safely re-used when you create new flows. This ‘safe’ code reuse is exactly what you are doing each time you drag and drop a node onto your workspace.
Nodes
Nodes are the primary building block of Node-RED flows. When a flow is running, messages are generated, consumed and processed by nodes. Nodes consist of code that runs in the Node-RED service (javascript .js file), and an HTML file consisting of a description of the node, so that it appears in the node pane with a category, colour, name and an icon, code to configure the node, and help text. Nodes can have at most one input, and zero or more outputs[3].
During the initialization process, the node is loaded into the Node RED service. When the browser accesses the Node RED editor, the code for the installed nodes is loaded into the editor page as illustrated in Fig. 5.1.
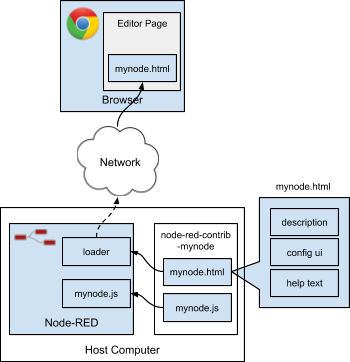
Figure 5.1 Node RED loads both HTML for the editor and JavaScript for the server from the node packages.
As you saw in Lecture 2 (Figure 2.2), there are three core node types:
- Input nodes – generate messages for downstream nodes.
- Output nodes – consume messages, for example to send data to an external service or pin on a device, and may generate response messages.
- Processing nodes – messages that process data in some way, emitting new or modified messages.
In addition to these core types, there are two more categories:
- Credentials Nodes – these are nodes that hold the credentials used by one or more nodes to connect to an outside system or service such as the Sense Tecnic platform, MQTT or Pushbullet. These are displayed only in the credentials pane, not on the main pane, and are created as needed when you configure a node that requires credentials such as an API key or name and password. Once created, a credentials node can be reused by other nodes of the same type to connect to similar protocols or services. Even when all nodes that use those credentials are deleted from your flow, the credentials node will remain, so it’s a good idea to remove unused credentials nodes when they are no longer needed.
- User-created nodes – programmable nodes such as function nodes, or sub-flows are nodes created by you to do some custom work or reuse flow segments in other flows.
Wires
Wires define the connections between node input and output endpoints in a flow. They (typically) connect the output endpoints of nodes to inputs of downstream nodes indicating that messages generated by one node should be processed by the connected node next. Note that it is possible to connect more than one node to an endpoint using wires. When multiple nodes are connected to an output endpoint, messages are sent to each connected node in turn in the order they were wired to the output. When more than one node output is connected to an input endpoint, messages from any of those nodes will be processed by the connected node when they arrive. It is also possible to connect downstream nodes to upstream nodes to form loops. (You’ll see an example of wiring a node to an upstream node in example 6.5 in Lecture 6).
Context
So far, you have learnt that messages are the only way to get data into and out of nodes. While this is generally true, there is one exception to this rule which is available to function nodes. function nodes have access to a special object called context that is used to hold data in memory that lasts from one message arriving to the next[4]. This is important for nodes that need to maintain an index or count or sum data in messages. In addition to this local context, a global context context.global is available for sharing data between all of the function nodes of a flow. Some use cases for context will be covered when the function node is discussed in more detail.
Function Nodes
The function node is the ‘Swiss Army knife’ of nodes that you can use when there is no existing node dedicated to your task at hand. It’s great for doing specialized data processing or formatting for example. As the name implies, a function node exposes a single JavaScript function. Using the function node, you can write your own JavaScript code that runs against the messages passed in and returns zero or more messages to downstream nodes for processing. To write function nodes, you write a JavaScript function using the built-in code editor as shown in Fig. 5.2.
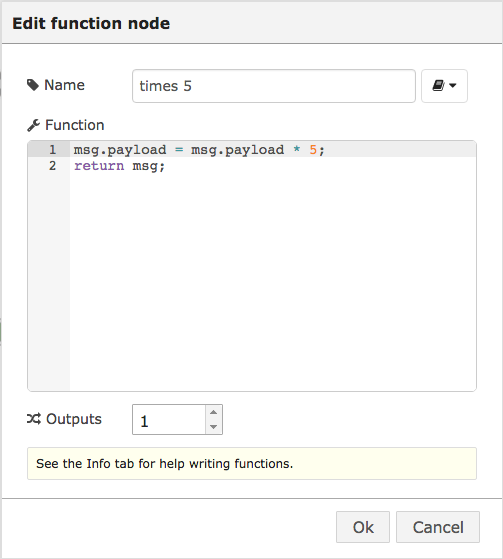
Figure 5.2 The function code editor.
If you are already familiar with writing JavaScript, then you can skip the next section, which is a very quick primer on JavaScript, which is used when you are writing your own function nodes.
JavaScript Primer
While we don’t have enough space here to cover JavaScript completely, we’ve written a short primer for those familiar with other programming languages to get started writing your own nodes. To experiment with JavaScript, you can use the JavaScript console supplied with your favourite browser or startup node.js to run the Read-Eval-Print-Loop (REPL) on your machine.
Read the JavaScript primer
Writing Function Nodes
Let’s get started writing function nodes. To test these out, you’ll create a simple flow with an inject and a debug node as shown in Fig. 5.3.

Figure 5.3 Simple flow to test our function nodes.
The most simple function node just returns null. When you return null, no message is passed on to downstream nodes and the flow ends here. To create a node that passes the message “as is”, you can simply return the message itself. This is the default code in a function node.
- return msg;
Neither of these cases are very interesting, so let’s add some content to the payload. In this example, and the next set of examples that explore writing JavaScript code for the function node, you will use the same flow (i.e that shown in Fig 5.3) and you’ll edit the function node to change the JavaScript using the function node editor as shown in Fig 5.2.
Listing 5.12 Adding some text to the incoming message payload
1 msg.payload += “world”;
2 return msg;
In this example (listing 5.12), a simple string concatenation operator is used to add the string “world” to the incoming message payload (line 1). This updated payload is then sent, using return, as the output message (line 2) to the next node in the flow.
If you edit the function node you’ve just created and type in the code from listing 5.12 when you deploy and test the flow, you will see in the debug pane the timestamp for the inject node and the text “world” appended.
Obviously, if you now edit the inject node to inject a string instead of the timestamp, and set the injected string to “hello”,you will see “hello world” in the debug pane, when you deploy and test.
Example 5.1 Creating and returning a new message in a function node
Listing 5.13 shows you how to create a new message by defining a new message newMsg, assigning the string “new payload” to the property payload (line 1) and then returning the new message at line 2.
Listing 5.13 Creating and returning a new message
1 var newMsg = { payload: “new payload” };
2 return newMsg;
If you modify the test function node you set up as shown in Figure 5.2 and use the code from Listing 5.13 when you deploy the flow and hit the inject button, the new message you created is output when it arrives at the debug node.
Example 5.2 Creating and returning multiple messages in a function node
The function node also allows you to configure it with multiple outputs. Once you’ve configured multiple outputs, you can send multiple messages, one to each output, using an array.
First, let’s edit the function node to tell Node-RED that the node will have three outputs, using the node configuration window (Fig. 5.4).

Figure 5.4 Setting the number of outputs that a function node provides
Listing 5.14 illustrates how to send a message to one of three different outputs based on a message payload value ‘high’, ‘med’ or ‘low’:
Listing 5.14 Returning message on multiple outputs using an array of messages
- if (msg.payload == “high”) {
- return [ msg, null, null ];
- } else if (msg.payload == “med”) {
- return [ null, msg, null ];
- } else {
- return [null, null, msg];
- }
Line 1 checks the incoming payload to see if it is set as “high”. If yes, then it passes on the message on the first output and null messages on the 2nd and 3rd output at line 2 by returning an array with three elements, [msg, null, null]. A “med” message causes a message to be returned on output 2 (line 4). Anything else returns a message on output 3 (line 6).
To try it out, wire it up to three inject nodes and three output nodes as shown in Figure 5.5. Set the different inject nodes to inject a text string of either low, med, high, edit the test function and use listing 5.14, and then deploy. As you select the different inject nodes, you will see the appropriate debug node fire in the debug pane.
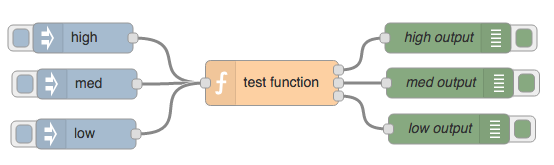
Figure 5.5 Flow to test multiple function outputs
It is also possible to send multiple messages from a function node in sequence. To do this, you return an array of messages in the output message array. Listing 5.15 shows how to write a function that returns 10 new messages containing number payloads from 0 to 9. Line 1 creates a new array, msgList, to hold the messages. Lines 2 and 3 loop 10 times adding a new element to the array msgList. Finally, line 5 returns an array, containing 1 element, msgList, which is itself an array of 10 elements. As you saw in the previous example, by returning an array with one element, you are sending a message on the 1st output of the node. However, this time, because the array element actually contains another array msgList, which itself has 10 elements, Node-RED sends each element as a series of sequential messages on output 1.
Listing 5.15 Returning multiple messages on one output using an array of messages
- var msgList = [];
- for (var i=0; i<10; i++) {
- msgList.push({payload:i});
- }
- return [msgList];
Node functions
Your function node code has access to a few utility functions from the built-in node module. These allow you to log text to the console or debug output and send messages from callback functions rather than returning them from the function node itself.
- node.log() – logs messages to the console
- node.warn() – logs messages to the console and a warning message in the debug pane
- node.error() – logs to the console and an error in the debug pane.
In FRED, the Node-RED console can be viewed by going to the landing page, then clicking on the “Status” menu in the drop down menu under your name. Since it can be a bit cumbersome to switch back and forth between the NR editor and the console, you can open the status dialog in a separate tab, then hit the refresh button to see updates to the console. Since the node.warn and node.error functions also output to the debug pane, it is sometimes useful to utilize these functions for debugging when the console is not available.
In addition to these logging and debugging functions, the node.send() function can be used to send messages to downstream nodes in a callback function, rather than returning the message(s). Listing 5.16 illustrates how to use node.send() in a function node that sends a message after a specific amount of time.
Listing 5.16 Example of how to use node.send in a callback
- // send message after 10 second delay
- setTimeout(function() {
- node.send(msg);
- }, 10000);
- return null;
Other modules that are available to function nodes include the following:
- console – while the Node.js console module is available, node.log() is the preferred method of logging
- util – the Node.js util module. This module provides useful utilities such as string formatting functions and generating string representations of objects. For more informaton on the util module see the Node.js documentaiton at https://nodejs.org/api/util.html
- Buffer – the Node.js Buffer module is for handling raw binary data from TCP streams or from files. For more informaiton on the Buffer module, see the Node.js documentation at https://nodejs.org/api/buffer.html.
Example 5.3 Using Context in a function node
A special module called context,used to store data between function invocations, is available to function nodes. This can be useful when the function needs to retain state to do its processing. For example, let’s use context to count the number of messages that a function node has processed since it was deployed. Let’s create a function node that adds a count property to each message it processes, as in Listing 5.17.
Listing 5.17 Function to count messages.
- if (!context.value) {
- context.value = 0;
- }
- context.value +=1;
- msg.count = context.value;
- return msg;
It can be wired up, as usual based on that shown in Figure 5.3), to give it a try. Be sure to change the debug node to display the ‘complete msg object’ so you can see your count property. You’ll probably notice that context is reset every time the function node is deployed. If you need to save state between deployments, you’ll need to use some external storage such as a file or a database.
Example 5.4 Using Global Context
In addition to individual function node context, a global context module is available to share context between function nodes. Let’s use this module to see how accurate a delay node is, as shown in Fig. 5.6.
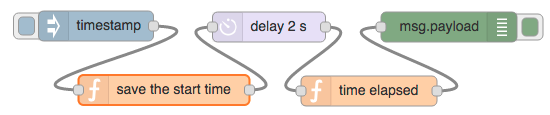
Figure 5.6 Flow to calculate the time elapsed for a message to go through the delay node.
The code for the function node called save the start time is shown in Listing 5.18.
Listing 5.18 Code to save the start time of the flow in a global context property.
- context.global.startTime = new Date().getTime();
- return msg;
Another function node, called time elapsed (see Listing 5.19), generates a message containing the time elapsed since a message passe through the save the start time function.
Listing 5.19 Code to calculate the elapsed time.
- var currentTime = new Date().getTime();
- var timeElapsed = (currentTime – context.global.startTime)/1000;
- msg.payload = “Time elapsed is: “+timeElapsed+”s”;
- return msg;
Add and configure a delay node to delay the message for 2 seconds, click on the inject node, and wait about 2 seconds. If all goes well, the debug output should indicate the time elapsed was close to 2 seconds.
The advantage of this approach is that we need not have a message that carries the start time. The disadvantage is that, if another message arrives at save start time before time elapsed, the context.global.startTime variable will be overwritten.
Saving your Function code in a library
Once you have created some useful code for use in a function node, it is often useful to save that code for later reuse. One way to do this would be to cut and paste it into a new function, but to save you time, you can use the function node library that is built into Node-RED.
To save your code in the function library, click on the Book icon in the function node configuration dialog to the right of the name text edit box, and select “Save to Library”. You can then provide a folder name and a file name to save your code as shown in Fig. 5.7.
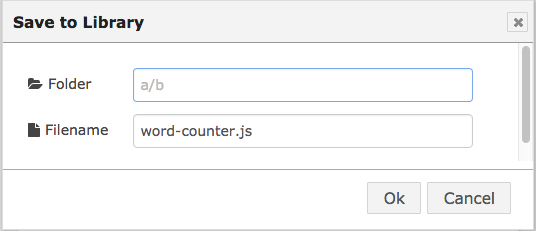
Figure 5.7 Save to library dialog
To make use of your code you can create a new function node, click on the book icon, then click on “Open Library…” then choose your saved library code. The code will be loaded in the dialog. If that’s the code you want, click OK, and it will be added to your function node. You can then edit it as needed.
Sub-Flows
Sub-flows are a way to reuse useful flow segments in Node-RED as fully fledged nodes in the node pane that you can drag into your flows. While it’s possible to save flow segments using the flow library (as described at the end of lecture 2), having flow segments in the node pane provides a level of encapsulation and information hiding that importing saved flows doesn’t offer. Encapsulation means that it is organized into a single item (node) that can be referred to using a single name; information hiding means that the inner workings of the sub-flow are hidden – you can change how the sub-flow does its job and the flows that use it will not change.
They can be created in two ways: either by selecting parts of your flow and creating the sub-flow from the selection, or from scratch. To create one from a selection, select the nodes in the sub-flow, click on the menu > Subflows> Selection to Subflows. This will immediately create a new, numbered sub-flow in the node pane under the “sub-flows” category.
You can also create a new sub-flow from scratch by clicking on the menu > Subflows > Create Subflow menu. After creating a new sub-flow, or editing an existing sub-flow by double-clicking on it in the node pane, a sub-flow tab will appear in the main pane. Unlike a regular tab, this tab has four buttons in the top left: “edit name”, “+ input”, “+ output” and “delete subflow”. In this pane, you can edit the sub-flow, add nodes by dragging and dropping them to the sub-flow pane, and wire them up as needed. To connect this sub-flow to the flows that use it, you can add a single input node and any number of output nodes, using the +input and +output buttons.
Example 5.5 Creating a sub-flow
Let’s create a sub-flow that switches outputs depending on the sentiment of messages received. This can be used to analyze messages from various sources, including Twitter. First, create a sub-flow: Menu>Create Subflow. Drag a Sentiment analysis node to the pane, then drag a Switch node. Wire up the Sentiment flow to the switch and configure the switch as in Fig. 5.8.
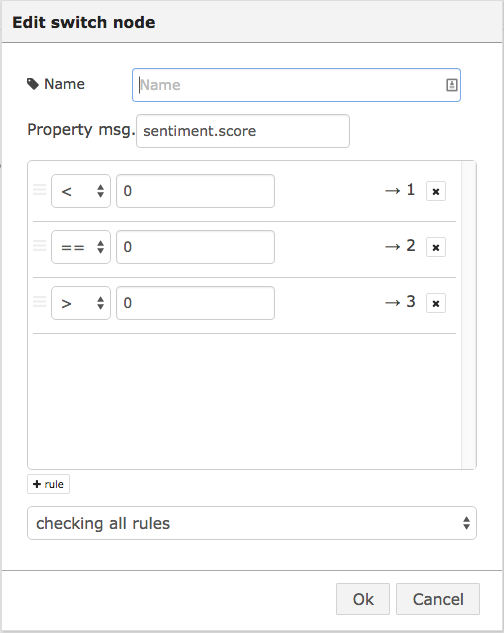
Figure 5.8 Switch node configuration for sentiment switch sub-flow
This will output a message to output 1, if the score is negative, to output 2, if it is neutral, and to output 3, if it is positive. Now, add an input and three output nodes. Wire up the input to the sentiment and the output nodes to the switch as in Fig. 5.9.
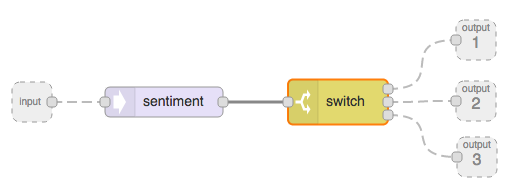
Figure 5.9. Sentiment switch sub-flow.
To edit the name of the sub-flow, click on ‘edit name’ in the pane and call it something like Sentiment Switch. You will see your new node in the sub-flows section in the node pane.
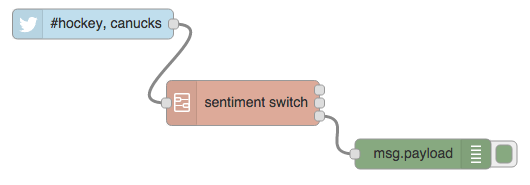
Figure 5.10 Flow using sentiment switch sub-flow to display positive tweets about hockey and the canucks.
Let’s use this to output only the positive messages about hockey from a Twitter feed. Add a new tab, drag in a Twitter node, the new Sentiment Switch sub-flow node you created and a debug node, as shown in Fig. 5.10. Wire up Twitter to the input and debug to the third output node of your new Sentiment Switch. After a minute or so, hopefully, someone will tweet something positive about hockey, and you’ll see some output in the debug pane!
Example 5.6 Packaging Function nodes using sub-flows.
Sub-flows are also a nice way to package up function nodes so that they appear in your node pallette and can be dragged into your flows for easier reuse. To illustrate this, let’s package up our counter function inside a sub-flow. To get started, create a new sub-flow tab. Drag in a function node and add the code from Listing 5.17 – the one that adds a counter property using context.
Create a sub-flow as before and add a function node. Add the code from Listing 5.17. Then hook up inputs and outputs to our sub-flow as shown in Fig. 5.11. Let’s name this subflow ‘Counter’.
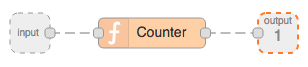
Figure 5.11 Counter sub-flow that wraps function node.
To test out our new flow, drive it from an inject node and set up a debug node, as shown in Figure 5.12. Be sure to show ‘complete msg object’ in your debug node to see the counter message property that was added.

Figure 5.12 Test for Counter sub-flow.
Now you have a ‘Counter’ sub-flow node you can drag in any time you like and use it in multiple locations in a flow.
Example 5.7. Creating a Slack Bot to query data
Let’s finish off this lecture with a more complex example that uses one of the extended node set that FRED provides – the slack bot node and queries data from the Openweathermap platform.
Openweathermap is a platform that provides weather forecast data from all over the world. By using the APIs of the website, we are able to query any location in Slack. You will need to setup a developer account on Openweathermap in order to use the openweathermap node on FRED.
This example will show you how to build a Slack integration that allows a slack user to query the openweathermap platform and returns weather data based on the simple query term.
For this example you will need to create what Slack calls a Slack Bot User (https://api.slack.com/bot-users) that will serve as a virtual user in your Slack application. So go ahead and create new bot (https://my.slack.com/services/new/bot), see Fig 5.13. If you don’t already have a Slack account, you will be guided through the account creation before you can return to the bot service.
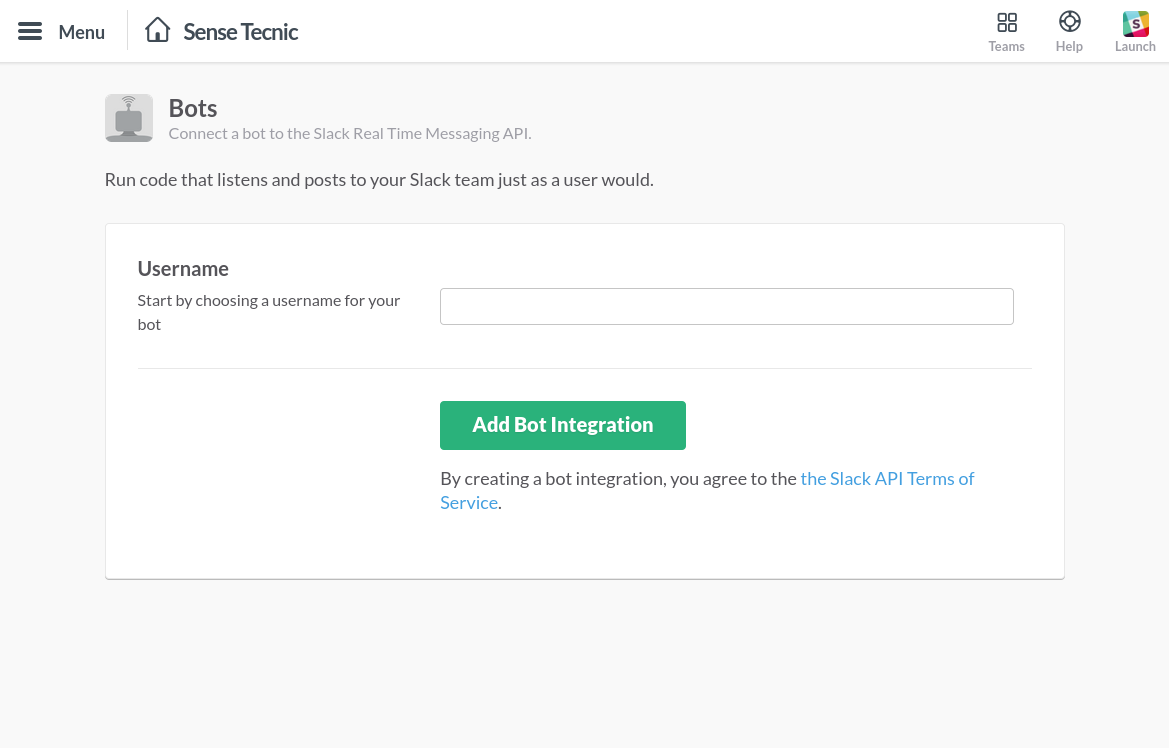
Figure 5.13 Creating a new Slack Bot
After creating your Slack Bot you will be given an API Token in the form (Fig. 5.14):
- xoxb-6816691748-vkIsdfsafE1RgF251yjPSm90WAAsadfSDF1
Which you should note down as you will need this token when you set up your flow.
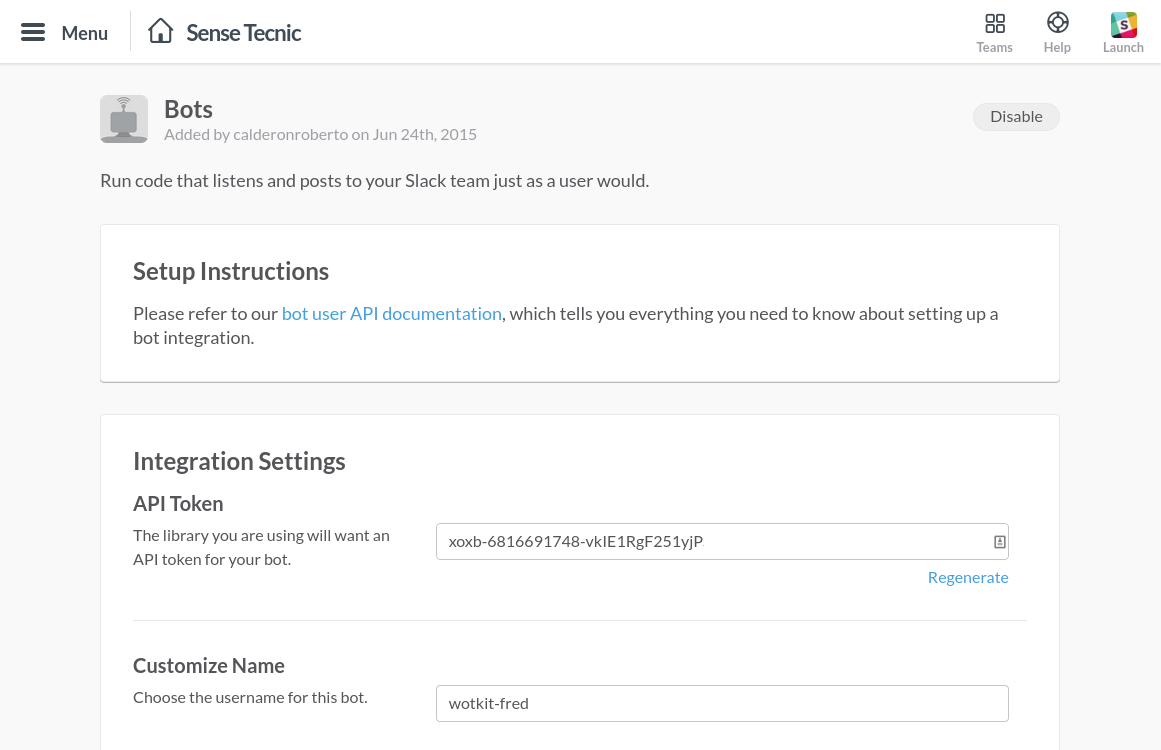
Figure 5.14 Slack returns a new API token for access to the Bot
Next, you will need to have the openweathermap node installed on your FRED instance. Simply install openweathermap node in “Add or Remove Nodes” from the side bar.
To do that, you should log into your FRED account and set up a new canvas for the flow. Drag and drop a Slack Bot In node into your canvas. Double click on it and configure by adding your Slack Bot API Token (Fig. 5.15). By default it will only listen into the #general channel (you can change this).
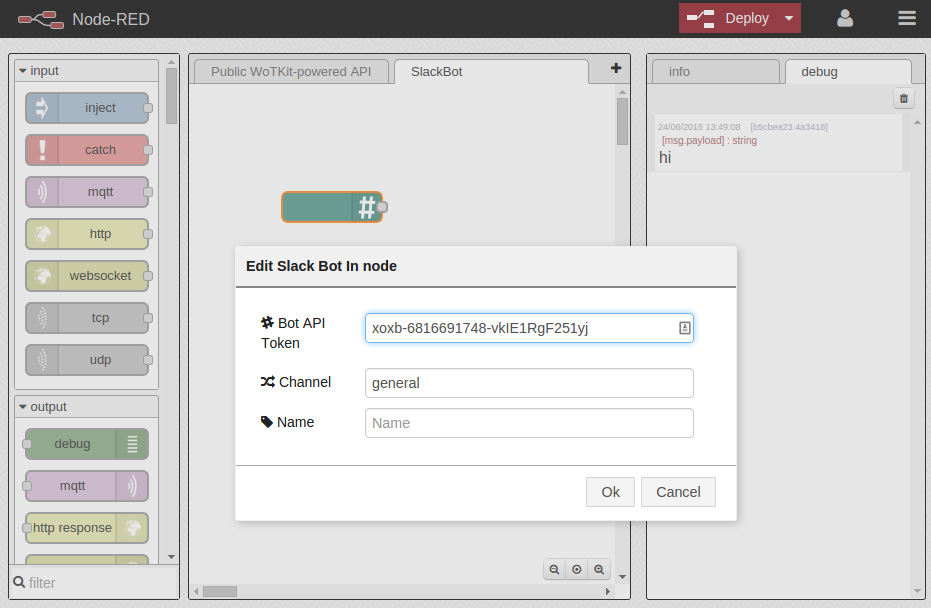
Figure 5.15 Configuring the Slack node with API token and channel
Now connect a function node and double click on it. You will need to set the function node with 2 outputs. Copy and paste the following function (Listing 5.20, Fig. 5.16):
Listing 5.20 A simple function to parse a text-based query
var query = msg.payload.split(",");
if (query.length == 2){
 msg.location={
 city:query[0],
 country:query[1]
 }
 return [msg, null];
} else {
 msg.payload="invalid search";
 return [null,msg]
}

Figure 5.16 Writing some function code to parse for queries on a slack channel
All this function does is parse the messages received by our Bot. If the message contains two words and the words are separated by “,”, it will slice the string and create a query parameter in the output message. This will become handy in the next step.
Next, connect an openweathermap node to your function node and don’t forget to add the API key in the configuration tab.
Then, you need to add a function node after the openweathermap node to parse the output response.
Simply add in the following code inside the function node:
var newMsg = msg;
newMsg.payload="The city you asked was "+
msg.location.city+", "+msg.location.country+", "+
"the weather is "+msg.payload.weather+" with "+
msg.payload.detail+". "+
"The temperature is "+msg.payload.tempc+"C right now.";
return newMsg;
Finally, you’ll need to add a new slack bot out node and configure it with your Bot API Token and Channel. The final flow will look like this (Fig 5.17).
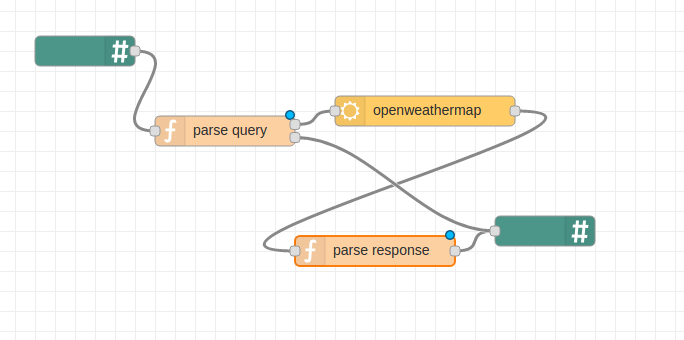
Figure 5.17 Configuring the slack bot out node
Now, to test that the flow work, return to your slack home page and either select the bot you created from the panel on the left. You’ll be presented with an input box, so type in:
| 1 | Vancouver, Canada |
The bot will query weather data from openweathermap and parse the weather forecast data back to the slack bot (Fig 5.18).

Figure 5.18 Results of querying ‘weather’ via your new slack bot
You are welcome to developer your own query features to find out all other possible functions you can have with FRED!
Summary
This lecture reviewed some of the key concepts behind Node-RED and introduced the context and global context objects used to share and maintain state between messages received by function nodes. The JavaScript overview in this lecture should enable you to start programming your own function nodes. Through some additional examples, you’ve seen how function nodes are an important and powerful aspect of Node-Red, allowing you to extend it as needed when a built-in node doesn’t quite do the job. This lecture also gave an introduction to sub-flows, demonstrating how they can be used to reuse flow segments and package up function nodes for easier reuse in your flows. Finally you’ve seen the use of the function node to develop a flow that uses a Slack Bot to make general queries to get data from public APIs.
About Sense Tecnic: Sense Tecnic Systems Inc have been building IoT applications and services since 2010. We provide these lectures and FRED, cloud hosted Node-RED as a service to the community. We also offer a commercial version to our customers, as well as professional services. Learn more.
© Lea, Blackstock, Calderon

This work is licensed under a Creative Commons Attribution-NonCommercial 4.0 International License.
[1] Node-RED, although often referred to as a Flow based language actually isn’t. The classical definition of flow based languages requires features that Node-RED doesn’t provide.
[2] It is possible for a function or other node to send any JavaScript type to an output endpoint to downstream nodes, but by convention, they should send message objects containing properties.
[3] Interestingly the current version (0.11.1) of Node-RED doesn’t have a maximum number of outputs.
[4] Currently (version 0.11.1 of Node-RED) only function nodes have access to this type of object, but this may be extended to other nodes in future.